Detector Services: Difference between revisions
| (13 intermediate revisions by 2 users not shown) | |||
| Line 109: | Line 109: | ||
== Quick Start == | == Quick Start == | ||
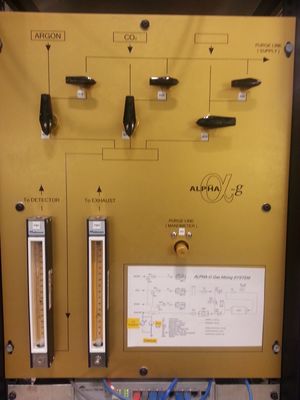
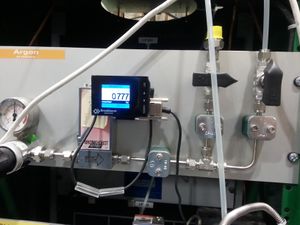
[[File:20181205 103217.jpg|thumb|Normal configuration of the manual valves of the GHS.]] | |||
From-scratch (Neither gas supply lines to the GHS nor connections to and from the TPC connected) connection of the GHS should follow the following procedure: | From-scratch (Neither gas supply lines to the GHS nor connections to and from the TPC connected) connection of the GHS should follow the following procedure: | ||
# '''Flush supply lines:''' Gas lines from outside bottles going to the GHS should be briefly (5 min or so) flushed with a high gas flow ''before'' connecting to the GHS to remove possible dust, and to minimize the amount of air in the lines. | # '''Flush supply lines:''' Gas lines from outside bottles going to the GHS should be briefly (5 min or so) flushed with a high gas flow ''before'' connecting to the GHS to remove possible dust, and to minimize the amount of air in the lines. | ||
# '''Flush GHS:''' | # '''Flush GHS:''' | ||
## Close BV3 | ## Close BV1 and BV3, open BV2 and BV4 to flush input lines, only briefly. | ||
## Open BV3 | ## Open BV1 and BV3, close BV2 and BV4 (normal operation configuration) | ||
## With Midas frontend running, use the "Gas" custom page to set a desired flow, for flushing probably between 1l/min and 1.5l/min (Without Midas, use the telnet interface), then press the "Bypass Flow" button, and let flow for a while (5-15min?) | ## With Midas frontend running, use the "Gas" custom page to set a desired flow, for flushing probably between 1l/min and 1.5l/min (Without Midas, use the telnet interface), then press the "Bypass Flow" button, and let flow for a while (5-15min?) | ||
# '''Flush TPC input line:''' | # '''Flush TPC input line:''' | ||
| Line 120: | Line 121: | ||
## On the "Gas" custom page, press the "Flow TPC" button and let flow for 5 min (Without Midas, use the telnet interface). | ## On the "Gas" custom page, press the "Flow TPC" button and let flow for 5 min (Without Midas, use the telnet interface). | ||
# Make all remaining connections | # Make all remaining connections | ||
== Troubleshooting == | |||
''' No flow ''' | |||
Make sure that the black valves on the gas rack at the entrance of the zone are open (right on the pictures). | |||
[[File:20190109 165410.jpg|thumb|The rightmost valve (black) must be open during operation.]] | |||
== Telnet Interface == | == Telnet Interface == | ||
| Line 162: | Line 172: | ||
| Length of one loop (on the rTPC) | | Length of one loop (on the rTPC) | ||
| 4.6m | | 4.6m | ||
|- | |- | ||
| Power extraction per water loop | | Power extraction per water loop | ||
| Line 187: | Line 191: | ||
== Operation == | == Operation == | ||
=== General === | |||
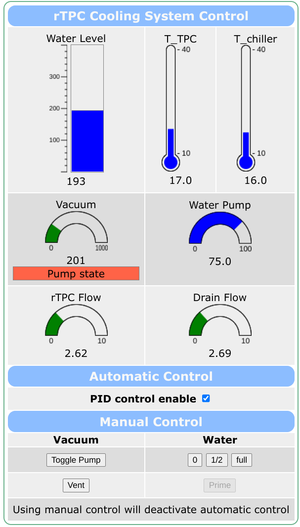
[[File:Cooling page.png|thumb]] | |||
The whole control system is operated from a Midas frontend running on a raspberry pi inside the black main control box. The sensors and controls are implemented using easy to use USB operated devices from http://phidgets.com. | |||
A pressure sensor measures the vacuum inside the vacuum vessel and controls an electric vacuum pump to keep it in the operating range. This is a simple on/off control using two set points, a high pressure, above which the pump gets turned on, and a low pressure below which it gets turned off. | |||
This vacuum is then used to draw water through the detector into the vessel, from the Open Tank. The vacuum vessel's water level is monitored by | This vacuum is then used to draw water through the detector into the vessel, from the Open Tank. The vacuum vessel's water level is monitored by an IR distance sensor mounted on the lid of the vessel, looking down at a reflective float in the water. This value is used in a PID loop in the control code to vary the speed of the water pump, thus changing the overall flow of water from the vacuum vessel to keep the water level in the vessel constant despite water being constantly drawn in by the vacuum. The water pulled from the vacuum vessel is pushed through the filter and into the Open Tank, completing the circulation. | ||
Cooling is accomplished in the water pump leg of the system, as coolant pulled from the vacuum vessel passes through a heat exchanger coupled to | Cooling is accomplished in the water pump leg of the system, as coolant pulled from the vacuum vessel passes through a heat exchanger coupled to a secondary cooling water loop on its way to the pump. This cooling loop is operated by a ThermoFisher ThermoChill III chiller. The rate that water flows through the system can be determined by many obstacles in the loop, but ideally it should be dominated by the position of the main Throttle Valve. Other valves should generally be set either fully open of fully closed, but there are individual valves on each of the 8 TPC loops, in case the flow doesn't balance evenly. | ||
Data outputs: there are five data outputs planned. The two process variables, the vacuum vessel absolute pressure, and differential water column pressure, will be sent to the Detector DAQ system. As well, the total flow rate is monitored by the flow meter, whose output is sent to the DAQ system. This data is not used by the circulation system itself. Likewise, the back pressure on the water filter is only sent to the DAQ system to indicate if the filter may need changing, and the temperature of the open tank is monitored and sent to the DAQ system, but currently there is no plan to use it in a temperature control feedback. The temperature of CERN's cooling water supply is not yet known, but we expect we can set the heat exchanger to run at a rate to hold the system temperature near 20°C without feedback control. | Data outputs: there are five data outputs planned. The two process variables, the vacuum vessel absolute pressure, and differential water column pressure, will be sent to the Detector DAQ system. As well, the total flow rate is monitored by the flow meter, whose output is sent to the DAQ system. This data is not used by the circulation system itself. Likewise, the back pressure on the water filter is only sent to the DAQ system to indicate if the filter may need changing, and the temperature of the open tank is monitored and sent to the DAQ system, but currently there is no plan to use it in a temperature control feedback. The temperature of CERN's cooling water supply is not yet known, but we expect we can set the heat exchanger to run at a rate to hold the system temperature near 20°C without feedback control. | ||
For the negative pressure to work effectively to prevent leaks, the water pressure in the detector ought to be down at least to half an atmosphere. With the detector cooling tubes 8x 4.6m of parallel 4.7mm ID copper tubes (2.3m down then 2.3 back-ups), and the supply using (perhaps 6m, 3 to the detector then 3 back) 9.7mm ID (=1/2" OD) poly tubing, the flow | For the negative pressure to work effectively to prevent leaks, the water pressure in the detector ought to be down at least to half an atmosphere. With the detector cooling tubes 8x 4.6m of parallel 4.7mm ID copper tubes (2.3m down then 2.3 back-ups), and the supply using (perhaps 6m, 3 to the detector then 3 back) 9.7mm ID (=1/2" OD) poly tubing, the flow needs to be somewhat greater than the required 3 l/min in order to maintain that degree of vacuum in the detector. | ||
The water pump leg of the circuit residing in the water cooling/gas rack is placed far enough from the fringe field of the superconducting magnet to prevent disruptive effects on the solenoid valves and electric motors. Therefore the main 1/2" poly line to and from the water pump and its flow loop will add a pressure drop which is estimated at 0.4atm for a 10m line at 6 l/min (9.7mmID), which is within our requirements. | The water pump leg of the circuit residing in the water cooling/gas rack is placed far enough from the fringe field of the superconducting magnet to prevent disruptive effects on the solenoid valves and electric motors. Therefore the main 1/2" poly line to and from the water pump and its flow loop will add a pressure drop which is estimated at 0.4atm for a 10m line at 6 l/min (9.7mmID), which is within our requirements. The splitting (and recombination) of the line to the 8 cooling lines close to detector is be accomplished with the use of 2 separate manifolds equipped with temperature sensors for constant in/out global water temperature monitoring. | ||
[[File:imageservice7.png|286x206px]][[File:imageservice8.jpg|286x206px]] | [[File:imageservice7.png|286x206px]][[File:imageservice8.jpg|286x206px]] | ||
| Line 205: | Line 213: | ||
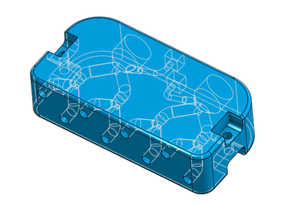
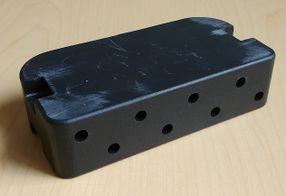
<span id="_Toc493684497" class="anchor"><span id="_Toc493684889" class="anchor"></span></span>Figure 6 - Model and 3D-printed realization of the dry-air manifold, very similar to the manifolds for the water cooling system. | <span id="_Toc493684497" class="anchor"><span id="_Toc493684889" class="anchor"></span></span>Figure 6 - Model and 3D-printed realization of the dry-air manifold, very similar to the manifolds for the water cooling system. | ||
=== Data outputs === | |||
Since the system runs off a raspberry pi, all variables and sensor values can be communicated to Midas. The main observables are: | |||
- vacuum pressure | |||
- water level in vacuum vessel | |||
- temperature in the water reservoir | |||
- flow through the TPC loop, measured at the input of the vacuum vessel | |||
- flow from the vacuum vessel to the reservoir, through the water pump | |||
=== Plumbing and maintenance === | |||
Currently, the water pump is not isolated from the system with valves, so replacement of a defective unit requires draining the system. Meanwhile a valved bypass to the water filter is provided to allow easily changing filter elements with the system running. If the system is leak free, the vacuum in the vessel should only be degraded by the dissolved air absorbed in the Open Tank and extracted in the vacuum vessel. However, this does not appear to be the case, and the vacuum pump currently turns on every ten minutes or so, but only for a few seconds. | |||
The wetted surfaces of this system are mainly PVC and Polyethylene for the valves, tubing and vessels, plus brass fittings, and the copper cooling tubes, and the stainless steel surfaces of the heat exchanger. | |||
A silver strip in the water reservoir serves as a biocide, but it has not been investigated how effective it really is, so the water should probably be replaced regularly. There is also the worry of corrosion due to the deionized water, so some regular check of the brass fittings and copper pipes should be performed. Any obstruction of the plumbing should be visible in the read back flows. | |||
=== Priming the water pump === | |||
The water pump will not start properly if it is | |||
# not filled with water and | |||
# working against the vacuum vessel vacuum | |||
In order to prime the pump, the vacuum vessel must contain water and be vented to atmospheric pressure. If the setup is otherwise set up correctly, this can be done automatically, using the '''Prime pump''' function in the manual control program detailed below. From a drained system starting point it will go through these steps (it will skip step 1 if there is already enough water): | |||
# pump down vacuum vessel to start sucking in water | |||
# when water level is high enough, vent vessel to atmospheric pressure | |||
# turn on water pump at medium speed | |||
# wait for a few seconds | |||
# check '''Output flow''' to see if water is flowing at expected rate | |||
# display status message | |||
=== Manual Control === | |||
In addition to the Midas frontend there is a manual control program called fulltest (should probably be renamed at some point). It reads back the phidget sensors and allows control via simple commands, which are given by the user as single letters followed by enter. | |||
{| class="wikitable" | |||
|- | |||
! Command !! Key !! Comment | |||
|- | |||
| toggle vacuum || '''v''' || turn vacuum pump on/off | |||
|- | |||
| toggle vent || '''V''' || open/close vent valve (also turns off vacuum pump) | |||
|- | |||
| toggle water pump || '''w''' || turn water pump on/off (should not be used as main mode for water pump control) | |||
|- | |||
| set water pump speed || '''s''' || prompts user to input a new speed setting in percent | |||
|- | |||
| set PID parameters || '''p/i/d''' || prompts user for new value for parameter | |||
|- | |||
| toggle PID control || '''c''' || switch PID control on/off | |||
|- | |||
| prime water pump || '''P''' || runs pump priming procedure (see [[Detector_Services#Operation#Priming_the_water_pump|Priming the Water Pump]]) | |||
|} | |||
== Quick Start == | |||
This assumes all water lines are connected, and both the blue water tank and the chiller are filled. | |||
=== Begin running === | |||
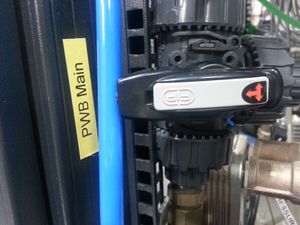
[[File:PWBmainOpen.jpg|thumb|Cooling system main valve open]] | |||
# Close vent valve and main valve (3-way valve in T position) | |||
# Switch on control box with power switch in the front | |||
# confirm the raspberry pi (cc00) is reachable from the network | |||
# start the Midas frontend (assuming everything is set up) | |||
# on the Cooling custom page check the *PID enable* box | |||
# Vacuum pump should now be running and the pressure in the vessel should drop. Wait for it to turn back off, once the pressure drops below the setpoint. | |||
# Open main valve, i.e. vertical connection open, connection to vent valve closed | |||
# water should start flowing through the PWB cooling system and coming back through the clear pipe connected to the vacuum vessel | |||
# check there is somewhat balanced flow through all 8 loops | |||
# if there is not, close the individual manual valves on the manifold and open one at a time, cycling through all 8 lines, to make sure all lines are filled with water | |||
=== Drain system === | |||
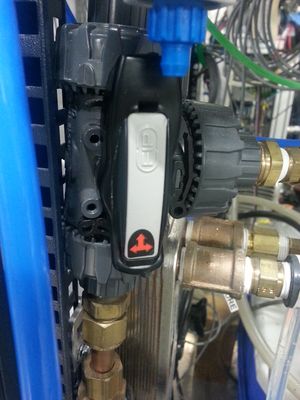
[[File:PWBmainVent.jpg|thumb|Cooling system main valve to vent valve]] | |||
# from normal operation, i.e. vacuum pump and water pump running | |||
# switch main valve to upside down T position | |||
# open vent valve | |||
# air should now enter the system, draining all water from the TPC pipes into the vacuum vessel | |||
# water pump will drain the vacuum vessel into supply tank, turn off PID control before the vessel is completely empty to avoid air in the water pump | |||
== Troubleshooting == | |||
The water system should be close to plug-and-play, but here are some failure modes and solution suggestions: | |||
; frontend won't connect, error messages in Midas | |||
: try to resolve reported errors, ssh into cc00 and try to run frontend manually | |||
; water pump running, but doesn't appear to pump much water | |||
: most likely air in the water pump. Follow the priming procedure outlined above. | |||
; vacuum pump comes on often (more than every 10 min) | |||
: probably an air leak in the system. Check for bubbles and try to find leak. | |||
; water level reading very high or nonsensical, visual level indicator shows vacuum vessel full | |||
: turn off PID control, vent vacuum vessel, and turn on water pump to go down to about half full, turn PID back on | |||
; frontend refuses to run in PID mode, complains about water level | |||
: see previous | |||
= Air Cooling = | |||
This section describes the cooling system for the BSC. | |||
== Overview == | |||
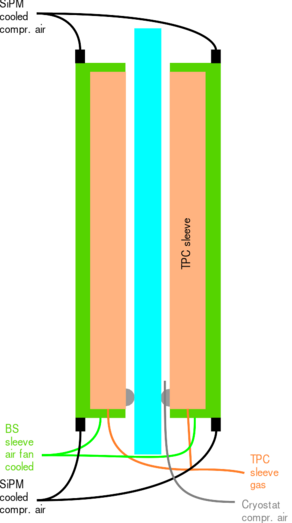
The dry air flow in the BSC sleeve aims at reducing the risk of condensation due to the temperature gradient caused by the hotter PWB. | |||
The constant flow has also affords a minimal control over the overall temperature of the BSC. | |||
The dry cold air in the SiPM enclosure is intended to set a fixed temperature for the SiPM operation and to cool 'Analog Sum Discriminator' modules or 'ASD'. | |||
[[File:Aircooling.svg|Schematic view of the distribution of cold air to the SiPM and the BSC sleeve.|292x523px]] | |||
== | == Implementation == | ||
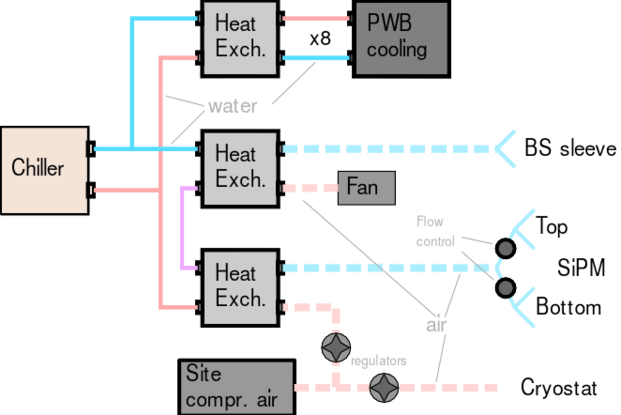
Air cooling scheme mediated by heat exchangers, fueled by the water chiller is shown below. | |||
[[File:Aircooling2.svg|Schematic view of the cooling circuit at the service rack]] | |||
Note that the circuit to cool the SiPM is going to be replaced in 2021 by 'Vortex cooler'. | |||
= Power distribution = | = Power distribution = | ||
Latest revision as of 00:25, 11 November 2021
Back to Main Page
Table of Figures
Figure 1 - Gas system schematic 6
Figure 2 - A half-rack space is used for the gas control implementation. 7
Figure 3 - Gas system half rack ready for installation 8
Figure 4 - Cathode pad half-cylinder. Pairs of cooling pipes are visible 9
Figure 5 - Water cooling system during test. 9
Figure 7 - Overall water cooling system 13
Figure 8 - Temperature Monitor Board 14
Figure 9 - End plate view of the layout of the different electronics boards & HV connections 15
Figure 10 – Unpotted Anode Wire Card and Board with HV distribution 17
Figure 11 - Anode wire pins and Field wire pins under yellow cover 17
Figure 13 - Anode wire pre-amp power distribution & 16 channel temperature boards 19
Figure 14 - Overall Low voltage distribution for anode wires and cathode pads 21
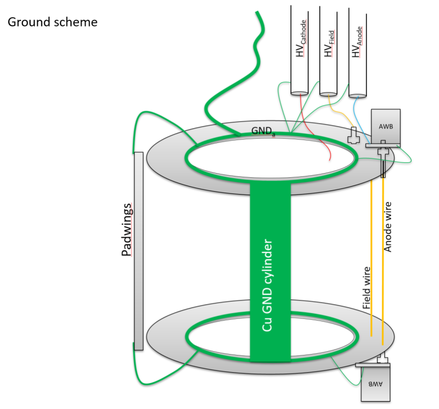
Figure 15 - High Voltage & Grounding scheme for the rTPC 22
Figure 16- Alpha-g rTPC rack organization 23
Introduction
This document is to describe the different services for the rTPC detector. 3 main sections cover the Gas system, the Water cooling system and the Power distribution.
A dedicated TRIUMF Wiki site gathers all documentations for the rTPC detector system and equipment. Gas system, cooling water system and power distribution can be found there.
Gas system
The gas system as described below includes the entire gas infrastructure required to deliver gas to the detector, monitor and control the gas flow into the detector. It also includes the necessary equipment to notify any change from the nominal gas flow or gas mixture ratio delivered to the detector.
This type of mixed gas system is well understood by the Triumf detector group staff and no issue in its realization is expected.
This system is a stand-alone infrastructure assembled and delivered to CERN. It will be placed in the Alpha-g experimental area floor. The delivery of the different gases to the experimental area is under the responsibility of the Gas handling group from CERN.
The gas delivery system for the radial TPC (rTPC) is to provide Ar/CO2 gas mixture between 90/10 to 50/50 depending on the user requirements. This system does not recycle the gas as the environmental impact of either gas is minimal and the operation cost versus a recycling system would not be economic.
In the event of an additional quenching gas requirement, the overall gas system will have to be reconsidered and possible recycling system envisaged.
A simple gas mixer using digital flow meters will provide the precise mixture dialed by hand in the control system.
During the prototype phase, an ad-hoc gas system will be put in place. A portable gas system is available for such a test.
Specifications
| Parameter | Value |
|---|---|
| Gas mixture | Ar/CO2 (90/10..50/50) |
| Gas flow requirements | 0.3l/min (50%), 0.3l/min (50%) |
| Detector gas Volume | 0.18m3 |
| Flushing time | 5h @ 600cc/min |
| Flow rate | 100 to 300 cc/minute |
Operation
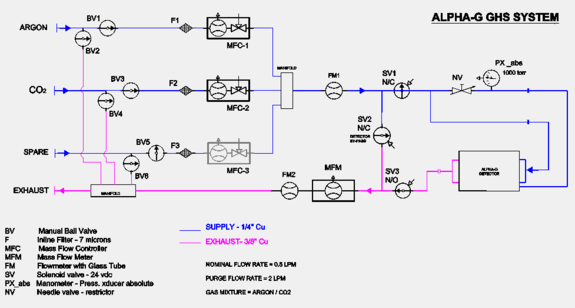
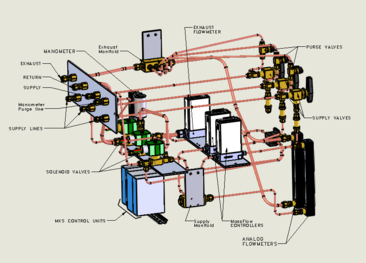
This gas system is quite simple as it takes 2 or 3 (spare) gas supplies and mixes them in a manifold before delivery to the rTPC detector. Necessary valves for purging lines and by-passing the detector are foreseen. The individual in-flows are controlled by gas dedicated mass flow controllers (MFC-x). The return flow is measured for leak assessment. An additional manometer monitors the internal detector pressure for evaluation of the electron drift characteristics.
Figure 1 - Gas system schematic
The main flow controller and monitoring is performed by industrial devices from MKS. We added analog flowmeters on each gas line to provide a quick visual inspection of the gas mixing system.
This system will be hooked to the CERN AD-Gas facility. The CERN gas delivers gas through 2 switchable packs of 12 bottles for each gas.
The gas exhaust is evacuated to the exterior of the experimental area with an elevation of about 8m.
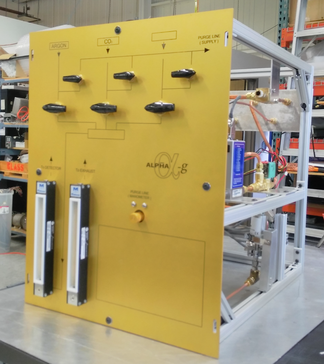
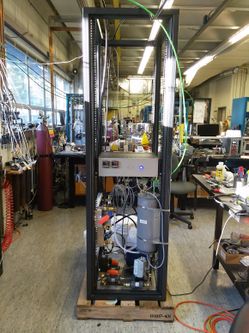
Figure 2 - A half-rack space is used for the gas control implementation.
Figure 3 - Gas system half rack ready for installation
Quick Start
From-scratch (Neither gas supply lines to the GHS nor connections to and from the TPC connected) connection of the GHS should follow the following procedure:
- Flush supply lines: Gas lines from outside bottles going to the GHS should be briefly (5 min or so) flushed with a high gas flow before connecting to the GHS to remove possible dust, and to minimize the amount of air in the lines.
- Flush GHS:
- Close BV1 and BV3, open BV2 and BV4 to flush input lines, only briefly.
- Open BV1 and BV3, close BV2 and BV4 (normal operation configuration)
- With Midas frontend running, use the "Gas" custom page to set a desired flow, for flushing probably between 1l/min and 1.5l/min (Without Midas, use the telnet interface), then press the "Bypass Flow" button, and let flow for a while (5-15min?)
- Flush TPC input line:
- Connect the line that will go from the GHS to the TPC input-tee on the GHS side, but leave disconnected from the tee
- do the same for the pressure gauge line
- On the "Gas" custom page, press the "Flow TPC" button and let flow for 5 min (Without Midas, use the telnet interface).
- Make all remaining connections
Troubleshooting
No flow
Make sure that the black valves on the gas rack at the entrance of the zone are open (right on the pictures).
Telnet Interface
If the Midas frontend is not available the GHS can be controlled via telnet. Connect with
telnet algas
then use the following command to control solenoid valves:
cowr do i 1
to energize SVi, i.e. to switch it from its normal closed or open state to the other state,
cowr do i 0
to de-energize, i.e. switch to default state.
Gas flow is set with:
mfcwr ao i <desired flow>
where i is 1 for Ar and 2 for CO2, and the desired flow is in the internal units of the system.
Water cooling system
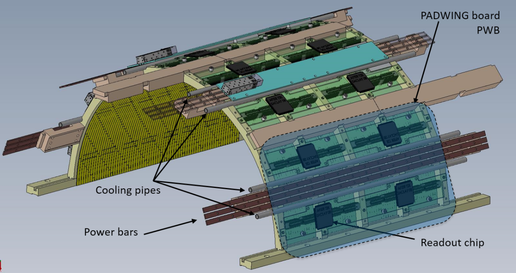
The outer surface of the detector has an arrangement of 8x8 electronics boards handling the readout of the cathode pads. These boards require operating at a controlled temperature to prevent heat build-up at the surface of the detector and improving the reliability of the system. In order to do so, 8 independent water pipe loops running from the bottom-up and down in the longitudinal axis of the detector are in a thermal contact to 8 successive readout boards. From the bottom, a pair of water hoses connect to 2 custom 3D-printed manifolds supplying the water feed and return to the 8 water loops.
These 8 loops are run in parallel to a negative pressure water cooling system. This negative pressure system is to ensure that no water leak will damage the electronics even during possible pipe or delivery hose breakage.
Figure 4 - Cathode pad half-cylinder. Pairs of cooling pipes are visible
Figure 5 - Water cooling system during test.
Specifications
| Parameters | Values |
|---|---|
| Number of parallel water loops | 8 |
| Copper pipe OD/ID | ¼” / 4.7mm |
| Length of one loop (on the rTPC) | 4.6m |
| Power extraction per water loop | 8x15W= 120W |
| Total cooling power | 1KW |
| Inlet water temperature | 16..20 degC (to be confirmed) |
| Outlet water temperature | 20..24 degC |
| Total water flow | 3..6 l/minute |
Operation
General
The whole control system is operated from a Midas frontend running on a raspberry pi inside the black main control box. The sensors and controls are implemented using easy to use USB operated devices from http://phidgets.com.
A pressure sensor measures the vacuum inside the vacuum vessel and controls an electric vacuum pump to keep it in the operating range. This is a simple on/off control using two set points, a high pressure, above which the pump gets turned on, and a low pressure below which it gets turned off.
This vacuum is then used to draw water through the detector into the vessel, from the Open Tank. The vacuum vessel's water level is monitored by an IR distance sensor mounted on the lid of the vessel, looking down at a reflective float in the water. This value is used in a PID loop in the control code to vary the speed of the water pump, thus changing the overall flow of water from the vacuum vessel to keep the water level in the vessel constant despite water being constantly drawn in by the vacuum. The water pulled from the vacuum vessel is pushed through the filter and into the Open Tank, completing the circulation.
Cooling is accomplished in the water pump leg of the system, as coolant pulled from the vacuum vessel passes through a heat exchanger coupled to a secondary cooling water loop on its way to the pump. This cooling loop is operated by a ThermoFisher ThermoChill III chiller. The rate that water flows through the system can be determined by many obstacles in the loop, but ideally it should be dominated by the position of the main Throttle Valve. Other valves should generally be set either fully open of fully closed, but there are individual valves on each of the 8 TPC loops, in case the flow doesn't balance evenly.
Data outputs: there are five data outputs planned. The two process variables, the vacuum vessel absolute pressure, and differential water column pressure, will be sent to the Detector DAQ system. As well, the total flow rate is monitored by the flow meter, whose output is sent to the DAQ system. This data is not used by the circulation system itself. Likewise, the back pressure on the water filter is only sent to the DAQ system to indicate if the filter may need changing, and the temperature of the open tank is monitored and sent to the DAQ system, but currently there is no plan to use it in a temperature control feedback. The temperature of CERN's cooling water supply is not yet known, but we expect we can set the heat exchanger to run at a rate to hold the system temperature near 20°C without feedback control.
For the negative pressure to work effectively to prevent leaks, the water pressure in the detector ought to be down at least to half an atmosphere. With the detector cooling tubes 8x 4.6m of parallel 4.7mm ID copper tubes (2.3m down then 2.3 back-ups), and the supply using (perhaps 6m, 3 to the detector then 3 back) 9.7mm ID (=1/2" OD) poly tubing, the flow needs to be somewhat greater than the required 3 l/min in order to maintain that degree of vacuum in the detector.
The water pump leg of the circuit residing in the water cooling/gas rack is placed far enough from the fringe field of the superconducting magnet to prevent disruptive effects on the solenoid valves and electric motors. Therefore the main 1/2" poly line to and from the water pump and its flow loop will add a pressure drop which is estimated at 0.4atm for a 10m line at 6 l/min (9.7mmID), which is within our requirements. The splitting (and recombination) of the line to the 8 cooling lines close to detector is be accomplished with the use of 2 separate manifolds equipped with temperature sensors for constant in/out global water temperature monitoring.
Figure 6 - Model and 3D-printed realization of the dry-air manifold, very similar to the manifolds for the water cooling system.
Data outputs
Since the system runs off a raspberry pi, all variables and sensor values can be communicated to Midas. The main observables are: - vacuum pressure - water level in vacuum vessel - temperature in the water reservoir - flow through the TPC loop, measured at the input of the vacuum vessel - flow from the vacuum vessel to the reservoir, through the water pump
Plumbing and maintenance
Currently, the water pump is not isolated from the system with valves, so replacement of a defective unit requires draining the system. Meanwhile a valved bypass to the water filter is provided to allow easily changing filter elements with the system running. If the system is leak free, the vacuum in the vessel should only be degraded by the dissolved air absorbed in the Open Tank and extracted in the vacuum vessel. However, this does not appear to be the case, and the vacuum pump currently turns on every ten minutes or so, but only for a few seconds.
The wetted surfaces of this system are mainly PVC and Polyethylene for the valves, tubing and vessels, plus brass fittings, and the copper cooling tubes, and the stainless steel surfaces of the heat exchanger.
A silver strip in the water reservoir serves as a biocide, but it has not been investigated how effective it really is, so the water should probably be replaced regularly. There is also the worry of corrosion due to the deionized water, so some regular check of the brass fittings and copper pipes should be performed. Any obstruction of the plumbing should be visible in the read back flows.
Priming the water pump
The water pump will not start properly if it is
- not filled with water and
- working against the vacuum vessel vacuum
In order to prime the pump, the vacuum vessel must contain water and be vented to atmospheric pressure. If the setup is otherwise set up correctly, this can be done automatically, using the Prime pump function in the manual control program detailed below. From a drained system starting point it will go through these steps (it will skip step 1 if there is already enough water):
- pump down vacuum vessel to start sucking in water
- when water level is high enough, vent vessel to atmospheric pressure
- turn on water pump at medium speed
- wait for a few seconds
- check Output flow to see if water is flowing at expected rate
- display status message
Manual Control
In addition to the Midas frontend there is a manual control program called fulltest (should probably be renamed at some point). It reads back the phidget sensors and allows control via simple commands, which are given by the user as single letters followed by enter.
| Command | Key | Comment |
|---|---|---|
| toggle vacuum | v | turn vacuum pump on/off |
| toggle vent | V | open/close vent valve (also turns off vacuum pump) |
| toggle water pump | w | turn water pump on/off (should not be used as main mode for water pump control) |
| set water pump speed | s | prompts user to input a new speed setting in percent |
| set PID parameters | p/i/d | prompts user for new value for parameter |
| toggle PID control | c | switch PID control on/off |
| prime water pump | P | runs pump priming procedure (see Priming the Water Pump) |
Quick Start
This assumes all water lines are connected, and both the blue water tank and the chiller are filled.
Begin running
- Close vent valve and main valve (3-way valve in T position)
- Switch on control box with power switch in the front
- confirm the raspberry pi (cc00) is reachable from the network
- start the Midas frontend (assuming everything is set up)
- on the Cooling custom page check the *PID enable* box
- Vacuum pump should now be running and the pressure in the vessel should drop. Wait for it to turn back off, once the pressure drops below the setpoint.
- Open main valve, i.e. vertical connection open, connection to vent valve closed
- water should start flowing through the PWB cooling system and coming back through the clear pipe connected to the vacuum vessel
- check there is somewhat balanced flow through all 8 loops
- if there is not, close the individual manual valves on the manifold and open one at a time, cycling through all 8 lines, to make sure all lines are filled with water
Drain system
- from normal operation, i.e. vacuum pump and water pump running
- switch main valve to upside down T position
- open vent valve
- air should now enter the system, draining all water from the TPC pipes into the vacuum vessel
- water pump will drain the vacuum vessel into supply tank, turn off PID control before the vessel is completely empty to avoid air in the water pump
Troubleshooting
The water system should be close to plug-and-play, but here are some failure modes and solution suggestions:
- frontend won't connect, error messages in Midas
- try to resolve reported errors, ssh into cc00 and try to run frontend manually
- water pump running, but doesn't appear to pump much water
- most likely air in the water pump. Follow the priming procedure outlined above.
- vacuum pump comes on often (more than every 10 min)
- probably an air leak in the system. Check for bubbles and try to find leak.
- water level reading very high or nonsensical, visual level indicator shows vacuum vessel full
- turn off PID control, vent vacuum vessel, and turn on water pump to go down to about half full, turn PID back on
- frontend refuses to run in PID mode, complains about water level
- see previous
Air Cooling
This section describes the cooling system for the BSC.
Overview
The dry air flow in the BSC sleeve aims at reducing the risk of condensation due to the temperature gradient caused by the hotter PWB. The constant flow has also affords a minimal control over the overall temperature of the BSC.
The dry cold air in the SiPM enclosure is intended to set a fixed temperature for the SiPM operation and to cool 'Analog Sum Discriminator' modules or 'ASD'.
Implementation
Air cooling scheme mediated by heat exchangers, fueled by the water chiller is shown below.
Note that the circuit to cool the SiPM is going to be replaced in 2021 by 'Vortex cooler'.
Power distribution
This section covers the different voltages and power requirements for the operation of the rTPC. This includes:
- High Voltage for the rTPC electron drift and amplification operation
- Low Voltage to the Anode wire frontend electronics
- Low Voltage to the Barrel Scintillator frontend electronics
- Low Voltage to the Cathode Pads electronics
- Grounding scheme of the overall rTPC
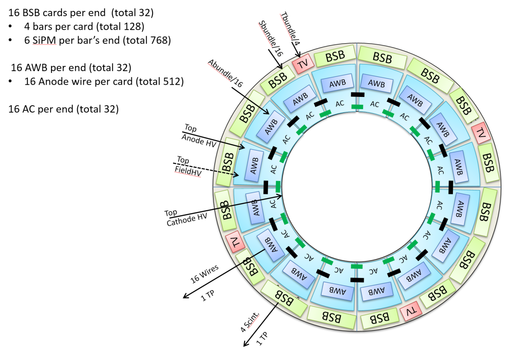
The provision of power to the different components of the detector is distributed from the top end plate of the rTPC.
Figure 9 - End plate view of the layout of the different electronics boards & HV connections
High Voltage for the rTPC
Three main components of the rTPC require High Voltage
- Main cathode wall (Negative ~5KV)
- Field wires (Negative ~ few hundred volts)
- Anode wires (Positive ~3.2KV )
These voltages are provided by a Quad High Voltage unit from CAEN. Three independent cables will be fed to the top of the rTPC.
High Voltage provision to the bottom endplate HV ring is taken from the central cathode near the bottom endplate.
The Field wire voltage is connected to all the field wire crimp-pins through a dedicated socket chain inserted on each of the crimp-pin on the top and bottom endplates. The field wires themselves interconnect the high voltage between the top and bottom pins.
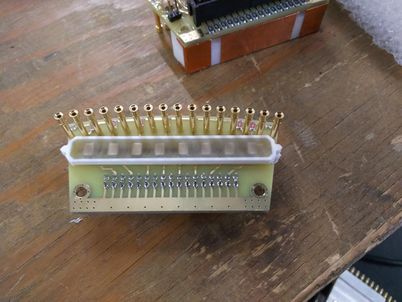
The High Voltage for the anode wires is delivered to the Anode Wire Card (AWC) which will distribute it to its 16 wires, Figure 11. There are 16 AWC cards covering each end of the anode wires. All the top and bottom 32 AWC are connected serially. The anode wires themselves interconnect the high voltage between the top and bottom pins.
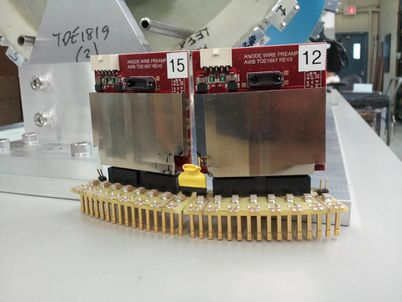
The anode wires pre-amplifiers boards (AWB) are sitting on the top of the Anode Wire Card (AWC) Figure 10. As the wire is powered by the HV, each anode wire has a high Voltage decoupling capacitor to isolate the pre-amp stage from the HV. This circuit resides on the AWC. The AWB will see the AC coupled anode signal only. With a new design of the AWC Figure 12, the decoupling capacitors are potted in epoxy to ensure proper isolation of the HV toward the surrounding circuit as well to prevent corona discharge due to relative humidity of the surrounding.
Figure 10 – Unpotted Anode Wire Card and Board with HV distribution
Figure 11 - Anode wire pins and Field wire pins under yellow cover
Figure 12 – New Anode Wire card with 16 potted HV capacitors, gold crimp pin Mill-max socket to the anode wire
Power distribution to the Anode wire frontend electronics
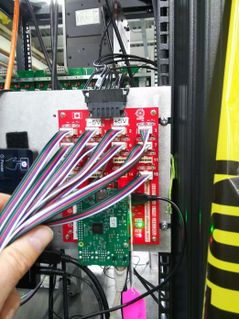
The AWB pre-amp board requires 2 voltages (+5V, -5V) which are fed through dedicated cable connections to each of the AWB. There are 16 AWB per end of the rTPC, therefore, 16 individual cable bundle will be reaching the top and another 16 the bottom of the rTPC. The cable bundle is to also provide the power return lines to the Power Supply.
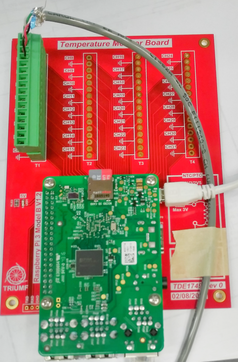
The PL508 Low Voltage power Supply from Wiener will provide the main power source for all the 32 pre-amplifiers. A dedicated connection breakout board with current monitoring capability splits the source power to the 2 x 16 necessary connections to the Anode wire boards. Based on a RaspeberryPi card, a 16 power distribution board is already implemented for the prototype. This board has extra 4 channels of temperature monitoring which can be used later on. In the same process we produce a similar board for 16 channel of NTC, RTC temperature monitoring. They will be used for overall detector and cooling system monitoring.
| Component | +5V Supply | -5V Supply |
|---|---|---|
| Anode Pre-amp | 1.5W (0.3A) | 1.5W (0.3A) |
Figure 13 - Anode wire pre-amp power distribution & 16 channel temperature boards
Power distribution to the Barrel Scintillator frontend electronics
Similar to the Anode wire pre-amplifier voltage distribution scheme, the Barrel Scintillators will require several low voltages for power and control. The Barrel Scintillator Boards (BSB) are mounted on both ends of the Scintillator bar with the same segmentation as the Anode wires i.e.: 16 BSB per end. The design of the electronic chain for the barrel scintillator is not fully designed yet.
The SiPM sensors require a bias voltage of the order of 28V. This voltage will be provided through the same mean as the low voltage power. Expected threshold voltage for the local signal level discriminator is also foreseen.
Low Voltage to the Cathode Pads electronics
The cathode pads electronics mounted on the external cylinder surface is composed of the analog frontend and the digital conversion electronics. Two voltages are required (+5.3V, +2.3V). The delivery is done through dedicated “power bar” running the full length of the rTPC. A set of 3 bars covers the 8 axial cathode pad electronics boards. 8 of them cover the circumference of the rTPC.
| Component | +5.3V Supply | +2.3V Supply |
|---|---|---|
| Padwing board | 10W (1.8A) | 2W (0.8A) |
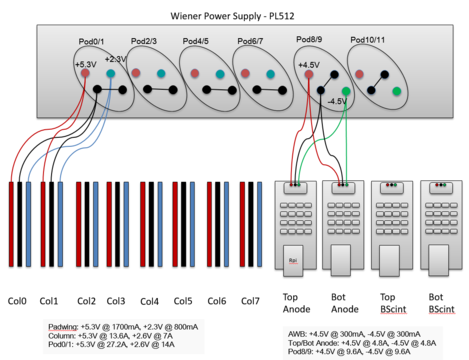
Overall the low power supplies are provided by a PL508-3U with 8 modules of either single or dual channels from Wiener.
Figure 14 - Overall Low voltage distribution for anode wires and cathode pads
Grounding scheme of the overall rTPC
The grounding scheme challenge in this setup is the far distance between the 2 end of the rTPC (2.3m) and the lack of accessibility to the bottom of the detector. The proposal is to use a Copper sheet mounted on the inner surface of the inner cylinder. This ground path will connect the 2 endplates to the High Voltage return. All the pre-amps will merge their ground to this central ground.
Additional ground lugs have been included in the Anode wire pre-amplifier boards to strengthen the ground as each anode wire is readout out from both end. This may be used once the full detector is assembled to address possible ground loop issues.
Safety and Hazard considerations
Gas
The Ar and CO2 do not require special health safety system. The detector will be operated in the ventilated hall of the AD building at CERN.
Gas flow, detector gas pressure, and gas inlet temperature are constantly monitored and can trigger adequate response for shutdown or closure of the gas system for safety purpose.
Cooling water
The water cooling system operates in negative pressure mode preventing any water leak to flood the detector outer surface. In addition water flow and inlet/outlet temperature are constantly monitored to allow fast response to off range parameter in order to shut down the electronics. The cooling water system requires a primary cooling tap water loop from the AD building. Water quality, water flow and water temperature are not under our responsibility. This aspect will be dealt during the initial phase of the rTPC commissioning at CERN.
Power distribution
All electronics voltages are below 48V. No special safety circuits are envisaged.
The high-voltage circuit is fully protected outside the detector. The access to the high-voltage on the detector is restricted to the two end-plates. Interlock scheme will be put in place to ensure the shutdown of the HV in case of manual access to the detector itself.
The LV (Low Voltage) power units are also interlocked to prevent false powering sequence which can damage the downstream electronics modules.
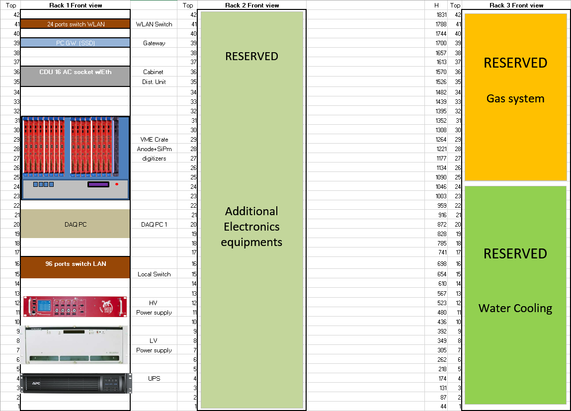
Figure 16- Alpha-g rTPC rack organization
