GSI TRB3
TRB3 is an FPGA-TDC board made and sold by GSI. It can achieve ~20ps timing resolution
Documentation
Computer Setup Instructions
Currently have gotten this working on an Opensuse machine.
We setup TRB3 on a private network. So need machine with second ethernet port.
Currently the work is being done with user trb3_user on computer daq14. This is a local user on that computer; not part of DAQ cluster.
Full instructions to be written
Start-up Instructions
These are the basic instructions to initialize and take data from TRB3, using the GSI DAQ tools.
1) Start the trb3 program and initialize the TRB3
cd /home/tbr3_user/trbsoft/daqtools/users/triumf_trb171
source startup.sh
2) Start event builder: In new terminal, do
cd trbsoft/daqtools/users/triumf_trb171/
 dabc_exe TdcEventBuilder.xml
3) ) Start webbrowser: In new terminal, do
cd /home/tbr3_user/trbsoft/daqtools/web/
./cts_gui --noopenxterm --port=1234 --endpoint=0xc001
open webbrowser and go to
4) Enable the readout of the channels we want.
i) Go to webpage
http://daq14.triumf.ca:1234/tdc/tdc.htm
ii) Under 'board' set it to 0100.
iii) Then click 'enable' radio button
iv) Then, under 0100 set all the channel groups to on. Should then start seeing triggers for different channels (if we have signals going into channels).
v) Finally, disable the trigger window on the same page. On the section c801 click off and make sure it says 'disabled'. If trigger window is disabled then all triggers are accepted...
Doing TDC analysis
This is how we do the TDC analysis using the GSI tools:
A) Setup the analyzer
source ~/trbsoft/trb3/trb3login
(This needs to be run in any terminal where you want to run the go4analysis
B) Create the set of calibration constants for the TDC
cd /home/tbr3_user/trbsoft/daqtools/users/triumf_trb171
rm cal*.cal  (remove old calibration files)
export CALTRIG=1; export CALMODE=-1;
go4analysis -number 100000 -user /data/trb3_data/saved/pulser17342114715.hld
(need to change this to use the hld file that you want to use)
The resulting calibration files are called something like cal_010X.cal. CALTRIG=1 means using trigger type 1 to do calibration. You can set this to different trigger type number, if required.
C) Now analyze more events, using those calibration files
rm *root
export CALTRIG=1; export CALMODE=0;
go4analysis -number 1000000 -user /data/trb3_data/saved/pulser17342114715.hld
now open the resulting root file
root -l Go4AutoSave.root
and use TBrowser() to look at the difference histogram. In particular, right now we look at the histogram TDC_0100/Ch3/TDC_0100_Ch3_RisingRef which shows the difference between the two synchronized input channels. This distribution should show a timing resolution between the hits of ~18ps if all the TDC calibration is working fine...
TRB3 MIDAS implementation
We have a working MIDAS readout of the TRB3 TDC data. Currently this readout uses a lot of the original GSI tools for setting up the TRB3 before the readout can start. At this time you need to do steps 1 and 2 described in "Start up instructions" in order to setup the TRB3 before starting the MIDAS frontend. Eventually we will try to remove as many as possible of the original GSI tools.
MIDAS frontend code is available here:
|https://bitbucket.org/ttriumfdaq/trb3_frontend%7C
The MIDAS frontend is setup to read events from the DABC event builder, which makes the events available on port 6789. You can see a running MIDAS TRB3 frontend here:
|https://daq14.triumf.ca:8443%7C
I added simple decoder and histograming classes to rootana. Currently I have only implemented the crude TDC calibration into the TRB3 bank decoders. In the long run we may want to integrate the fine TDC calibration directly into the frontend.
Useful TRB3 commands
a) Get IDs for TRB3 FPGAs (1 central FPGA and 4 FPGAs for TDCs):
trb3_user@linux-klyr:~/lindner> trbcmd i 0xffff
0xc001  0xe1000006e937ac28  0x05
0x0100  0x9c000006e937a028  0x00
0x0101  0x91000006e95e8328  0x01
0x0102  0x75000006e9383128  0x02
0x0103  0xe6000006e96e5228  0x03
b) Print out raw TDCs for the events that are coming in through event builder
hldprint localhost:6789 -onlytdc 0x0100 -num 0
c) Print out raw TDCs for events in file
hldprint //data/trb3_data/pulser17342114715.hld -onlytdc 0x0100 -num 0
d) Print out raw data stream from EB
hldprint localhost:6789 -raw
e) "Ping of death" somehow ping board to reboot it:
ping -pc001 trb171
Hardware Information
Clock and Trigger
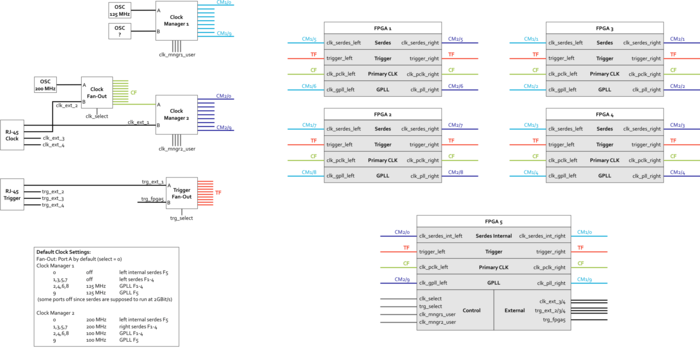
Michael Traxler provided the following picture of clock and trigger circuitry:
Michael also provides following details
Clock:
- system clock frequency of 200MHz can be taken either
from the internal oscillator, or via the second LVDS pair (pin 3 and 6) of the connector "RJ-45-Clock". They are distributed to all 5 FPGAs to the primary-clock-input.
- In all "modern" FPGA designs (since several years) you don't have to do
anything in registers to use the external clock. The scheme is simple: When an external clock is available and stable and the PLL locks to it at power up, the external clock is used. If not, the internal clock is used.
Trigger
- Yes, the trigger timing signal (or as we call it "reference time") is
expected on pin 1&2 of the connector "RJ-45-Trigger". No need to enable anything. This is true for all slave TRB3.
- If you have a CTS (or a single TRB3 setup) the trigger is generated in the
CTS, from external tigger sources. This you can see in Table 27 in the TRB3-manual (currently page 75).
- So, for the CTS, there are 4 different inputs available on the two RJ45
connectors, which all can be used at the same time. If you need more, you can add a CTS-AddOn on the backside of the TRB3 and then you have many more trigger inputs. Each input will generate a certain "trigger type" data word in the data stream to distinguish between the trigger inputs.
