Custom Page
Links
Purpose
The purpose of a user-created mhttpd Custom Web Page is to present the essential parameters of the controlled experiment in a more compact way. A custom page may even replace the default MIDAS Status Page.
Introduction
Custom web pages provide the user with a means of creating secondary user-created web page(s) activated within the standard MIDAS web interface. These custom pages can contain specific links to the ODB for the user to display and/or input information relevant to the experiment using a webpage. The user often creates a Custom Page when the standard pages do not meet his/her requirements completely.
Two ways of implementing custom pages are available:
- Internal
- The html code is fully stored in the Online Database (ODB).
- Limited capability, size restricted.
- The page is web editable.
- External
- ODB contains links to external html or Javascript document(s).
- Multiple custom pages are supported
- The page can be edited with an external editor.
External pages are more commonly used , so a "Custom Page" will be assumed to be an external page unless otherwise stated. All the features described for custom pages are available for both Internal and external pages.
Access a Custom Page
Access to a Custom Page is set up through the /Custom ODB tree (see access to a custom page). Clicking on the resulting custom-button on the mhttpd Status Page will display that custom page.
Custom Status Page
By using a name of "Status" (no "&") in the custom page key name, that page will replace the default Status Page. Clicking on the Status button on any of the sub-pages will return to the Custom Status Page. To return to the default Status Page, delete the /Custom/Status link.
Examples
Examples of custom pages are shown below. Click on the thumbnails to enlarge.
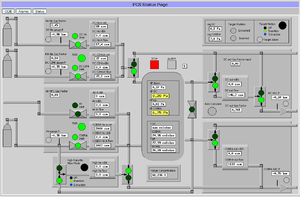
This page (Figure 1) from the MEG experiment at PSI shows a complex gas system. This shows the use of "fills" and "labels". The valves are represented as green circles. If they are clicked, they close and become red (provided the user successfully supplied the correct password).
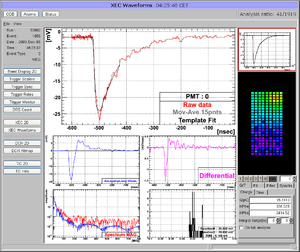
Many MIDAS experiments work with ROOT based analyzers today. One problem there is that the graphical output of the root analyzer can only be seen through the X server and not through the web. At the MEG experiment, this problem was solved in an elegant way: The ROOT analyzer runs in the background, using a "virtual" X server called Xvfb. It plots its output (several panels) normally using this X server, then saves this panels every ten seconds into GIF files. These GIF files are then served through mhttpd using a custom page. The output is shown in Figure 2.
The buttons on the left sides are actually HTML buttons on that custom page overlaid to the GIF image, which in this case shows one of the 800 PMT channels digitized at 1.6 GSPS. With these buttons one can cycle through the different GIF images, which then automatically update ever ten seconds. Of course it is not possible to feed interaction back to the analyzer (i.e. the waveform cannot be fitted interactively) but for monitoring an experiment in production mode this tool is extremely helpful, since it is seamlessly integrated into mhttpd. All the magic is done with JavaScript, and the buttons are overlaid on the graphics using CSS with absolute positioning. The analysis ratio on the top right is also done with JavaScript accessing the required information from the ODB.
For details using Xvfb server, please contact Ryu Sawada <sawada@icepp.s.u-tokyo.ac.jp>.
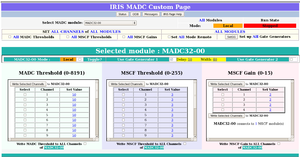
This custom page from the IRIS Experiment (Figure 3) allows the users to write the desired values of threshold and gain to the 16 MADC modules and 31 MSCF Modules used in the experiment. The page allows the users to set individual channels, or a group of channels, or all one module, or all modules to a particular value. This page makes extensive use of Javascript to update parts of the page and the three frames.
How to write a custom page
An example custom page available in the MIDAS package at ~midas/packages/midas/examples/custom/myexpt.html illustrates many of the
available features. You can use it as a template for your own custom page.
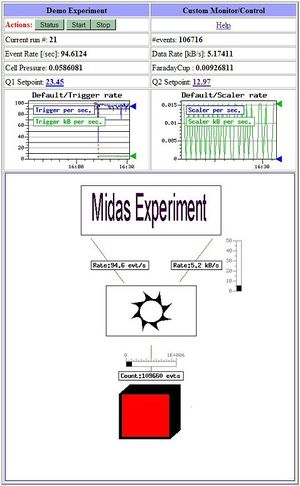
The file ~midas/packages/midas/examples/custom/xcustom.odb contains most of the ODB keys needed by this demo, including the contents of the /Custom ODB tree. This demo illustrates the use of an image file (~midas/packages/midas/examples/custom/myexpt.gif) with superimposed fills, labels and bars. These features are all added in the /Custom ODB tree.
This custom page is activated by adding the ODB key /Custom/MyExpt& which is a link to the custom page ~midas/packages/midas/examples/custom/myexpt.html see Keys in the /Custom tree).
Example custom page html code
The html code producing the custom page in Figure 4 is reproduced below for illustration. Comments have been added (numbered 1-7) to point out the various features that will be described in more detail below.
<!-- myexpt.html -->
<html><br>
<head><br>
<title>MyExperiment Demo Status</title>
<meta http-equiv="Refresh" content="30">   <!-- 1. Automatically refresh screen every 30s -->
</head>

<body>
  <form name="form1" method="Get" action="/CS/MyExpt&">         <!-- 2. Custom page location given by ODB key /Custom/MyExpt& -->
     <table border=3 cellpadding=2>
        <tr><th bgcolor="#A0A0FF">Demo Experiment<th bgcolor="#A0A0FF">Custom Monitor/Control</tr>
        <tr><td> <b><font color="#ff 0">Actions: </font></b>
          <input value="Status" name="cmd" type="submit">       <!-- 3. Access Standard MIDAS Menu Buttons -->
          <input value="Start"  name="cmd" type="submit" >
          <input value="Stop"  name="cmd" type="submit" >
          </td><td>
          <center> <a href="http://midas.triumf.ca/doc/html/index.html"> Help </a></center>   <!-- 4. External link -->
          </td></tr>
        <tr><td>Current run #: <b><odb src="/Runinfo/run number"></b></td>               <!-- 5. ODB Access from html -->
          <td>#events: <b><odb src="/Equipment/Trigger/Statistics/Events sent"></b></td>
        </tr><tr>
          <td>Event Rate [/sec]: <b><odb src="/Equipment/Trigger/Statistics/Events per sec."></b></td>
          <td>Data Rate [kB/s]: <b><odb src="/Equipment/Trigger/Statistics/kBytes per sec."></b></td>
        </tr><tr>
          <td>Cell Pressure: <b><odb src="/Equipment/NewEpics/Variables/CellPressure"></b></td>
          <td>FaradayCup   : <b><odb src="/Equipment/NewEpics/Variables/ChargeFaradayCup"></b></td>
        </tr><tr>
          <td>Q1 Setpoint: <b><odb src="/Equipment/NewEpics/Variables/EpicsVars[17]" edit=1></b></td>
          <td>Q2 Setpoint: <b><odb src="/Equipment/NewEpics/Variables/EpicsVars[19]" edit=1></b></td>
        </tr><tr>
          <th> <img src="http://localhost:8080/HS/Default/Trigger%20rate.gif?          <!-- 6. Link to History image -->
                          exp=default&scale=12h&width=250">
          </th>
          <th> <img src="http://localhost:8080/HS/Default/Scaler%20rate.gif?
                          exp=default&scale=10m&width=250"></th>
        </tr>
        <tr><td colspan=2>
          <map name="myexpt.map">                                                     <!-- 7. Map active areas -->
            <area shape=rect coords="140,70, 420,170"
                  href="http://midas.triumf.ca/doc/html/index.html" title="Midas Doc">
            <area shape=rect coords="200,200,400,400"
                  href="http://localhost:8080" title="Switch pump">
            <area shape=rect coords="230,515,325,600"
              href="http://localhost:8080" title="Logger in color level (using Fill)">
            <img src="myexpt.gif" border=1 usemap="#myexpt.map">
          </map></td>
        </tr>
     </table>
  </form>
</body>
</html>
The background image, fills, bars and labels are not found in the html code. They are added in the /Custom ODB tree.
Features available on custom pages
A custom page may be written in ordinary HTML code and/or JavaScript
It may include any of the following special features provided for use with MIDAS:
   Access to the standard MIDAS Menu buttons
   Access to the ODB using a Javascript built-in library
   Access to the ODB from html (no javascript needed)
   Password protection of ODB variables accessed from a custom page
   CustomScript Buttons
   Page refresh
   Alias-Buttons and Hyperlinks
   Access to message log
   Including checkboxes on a custom page
   Periodic update of parts of a custom page
   Image insertion into a Custom page
       Inserting a history image in a custom page
       Mapping active areas onto the image
       Display mouse position
       Superimposing Labels, Bars and Fills onto an image
       Edit boxes floating on top of a graphic


