Mechanical Design
Back to Main Page
Table of Figures
Figure 1 - Section view of the rTPC design.
Figure 2 - The G10 Inner Cylinder. Cu/Mylar foil is glued onto it to provide the Inner Cathode surface. Nine 6mm wide Aluminum strips (pitch 265mm) are on top of the Copper to act as targets for the four 266nm lasers.
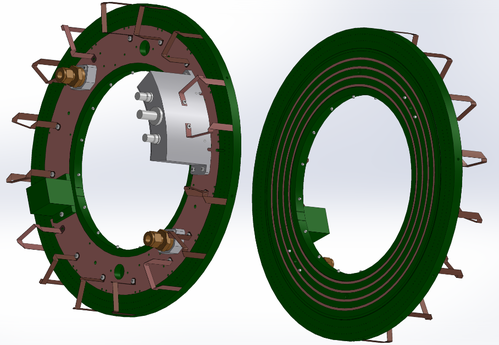
Figure 3 - End plates, both side visible. High Voltage box (grey), HV resistor chain box cover (green), concentric field-cage rings (Inner surfaces, red), gas fitting, ground strips joining semi-cylinder to end plates.
Figure 4 - This shows the rTPC (without outer Half-cylinders), in the clean room.
Figure 5 - Half cylinder model (prototype).
Figure 6 - Assembled prototype rTPC.
Figure 7 - SolidWorks model of the Outer half-shell mandrel.
Figure 8 - Left: Picture of partial assembly of G10 frame (plus four of the 9 jig clamp bars). Right: Mandrel with the 8 PCBs positioned and clamped with stainless bands.
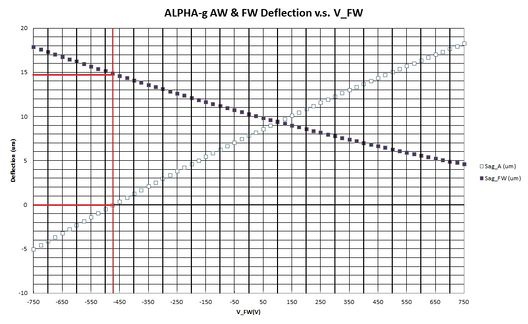
Figure 9 - Electrostatic deflections of Anode wires (30um Au/W 85gm tension) and Field Wires (75um Au/Be-Cu 120gm tension) for the Prototype rTPC, wire length 350.5mm.
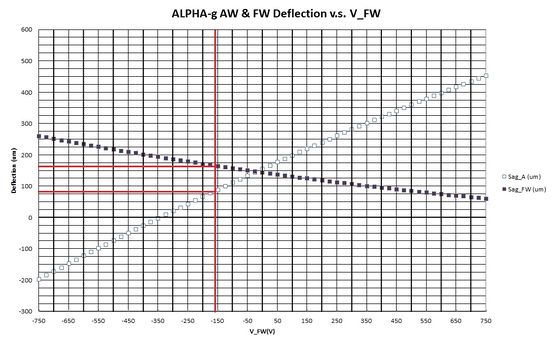
Figure 10 - Deflections of Anode wires (30um Au/W 130gm tension) and Field Wires (152um Au/Al 400gm tension) for the Full rTPC, wire length 2,366.5mm.
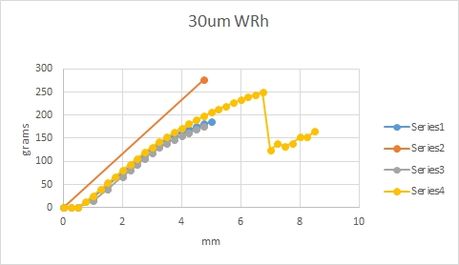
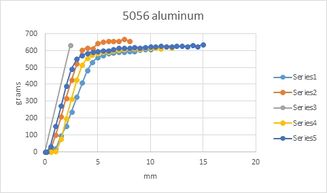
Figure 11 - Shows multiple stress-strain tests for samples of 30um Au/W-Rh wire (top) and 152um Au/Al (5056). The red and gray lines show the expected stress-strain for those materials.
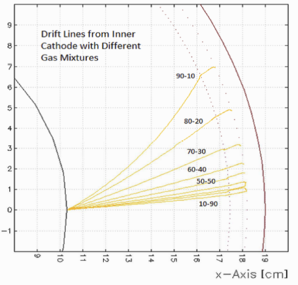
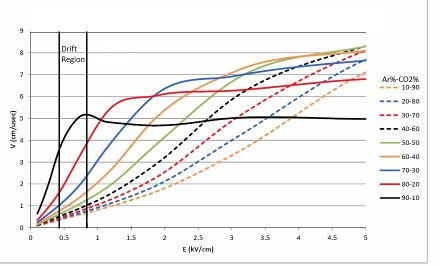
Figure 12 - Shows sample of Garfield Gas studies. Top - Drift velocities vs Electric Field. Bottom - Drift from Inner Cathode for 1 Tesla Magnetic field.
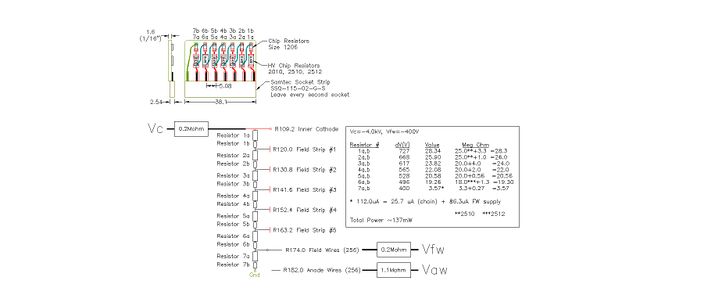
Figure 13 - Shows Resistor Chain PCB that provides the voltages for the end field-cage PCBs (mounted on inside face of Endplates).
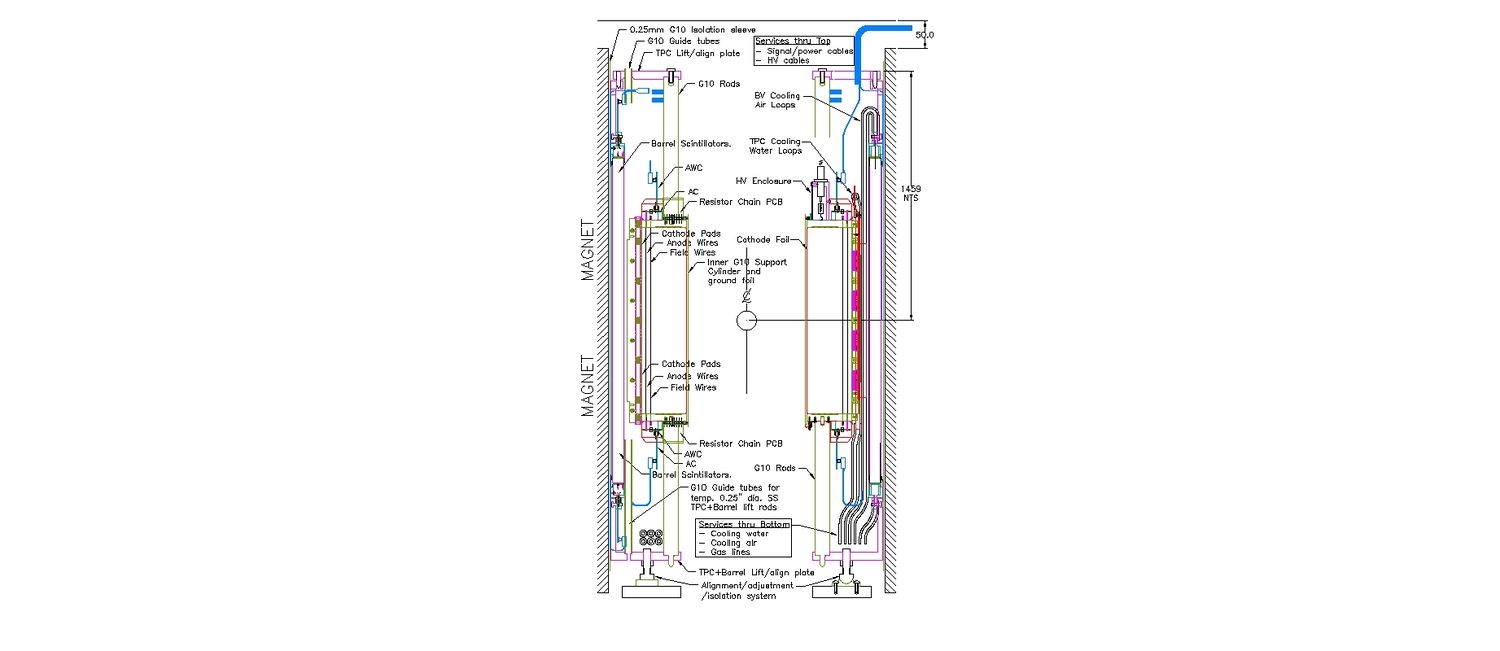
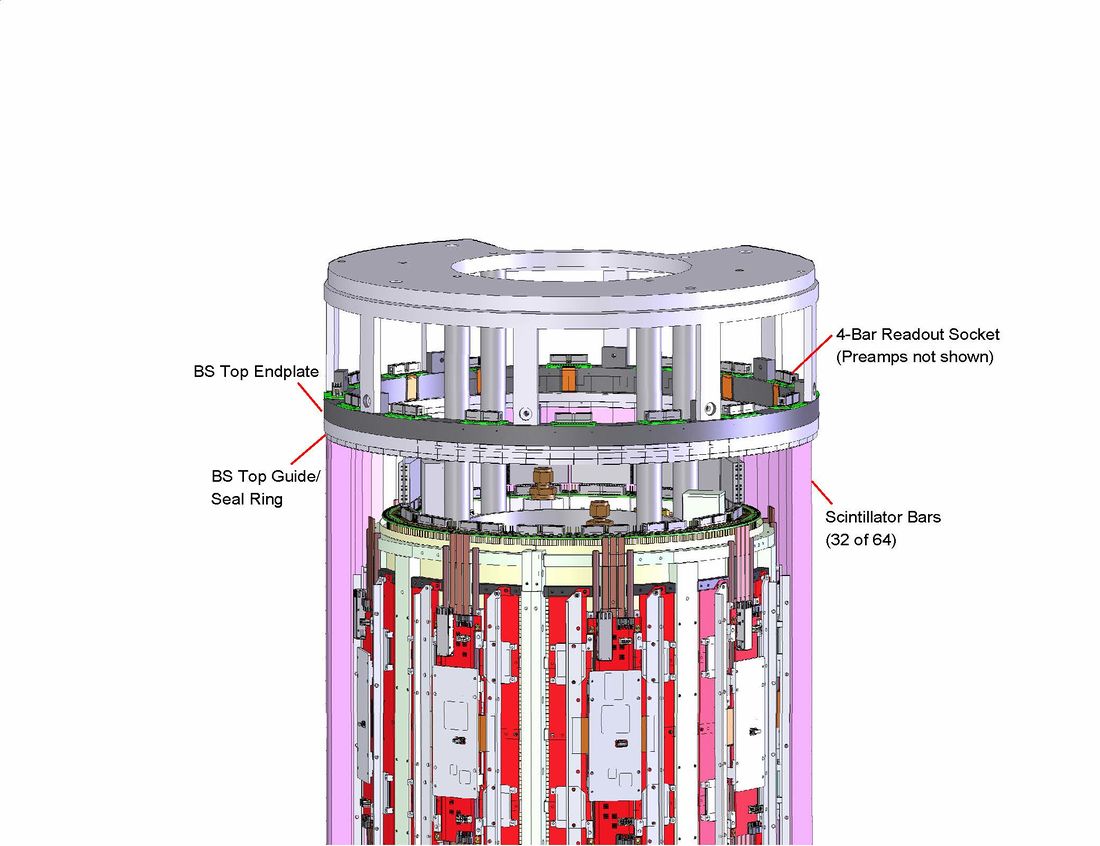
Figure 14 - Shows top end of rTPC and Barrel Scintillators. Anode cards (AC and AWC), HV enclosure for Vc, Va, and Vfw. rTPC and BV readout cables from bottom end come up through ‘gaps’. All HV, power, and RO services exit the magnet (top-right) though a 50mm Z-gap in a sector facing the nearby platform. The four top-end BV cooling hoses pass down through gaps to exit at bottom end.
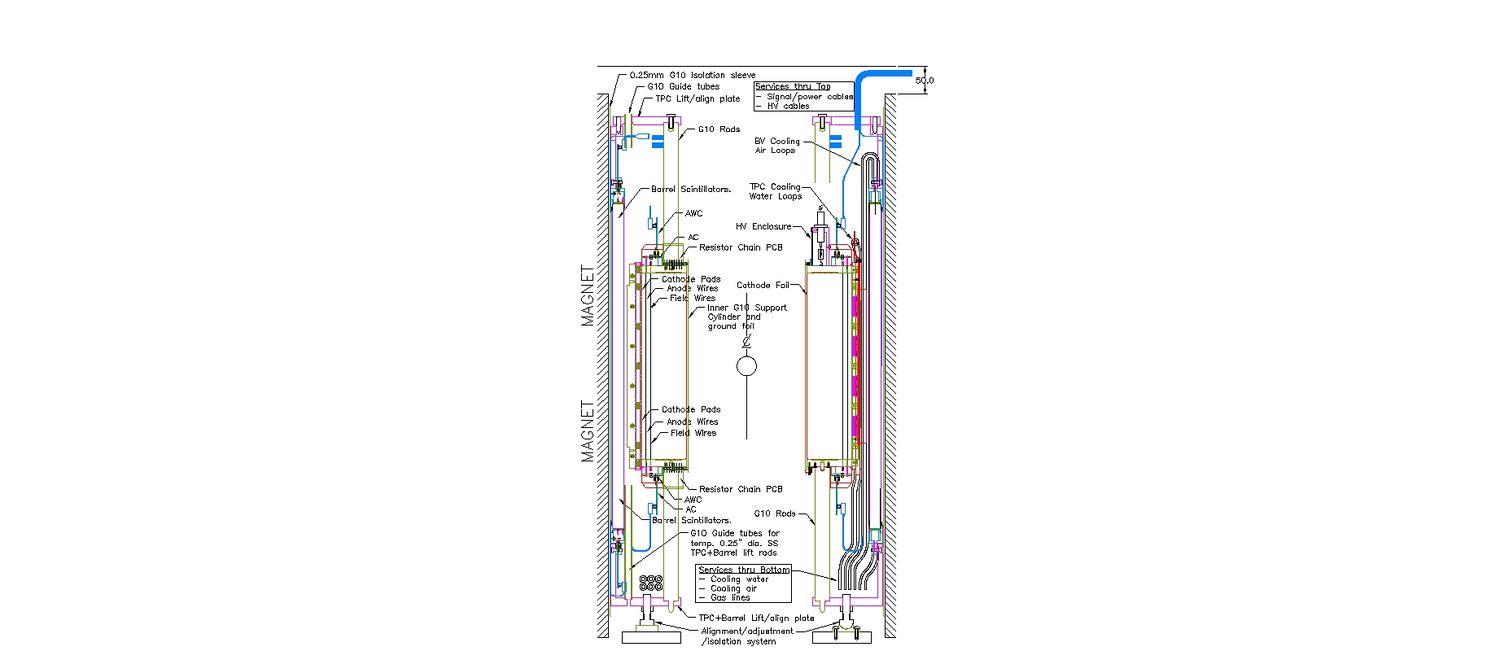
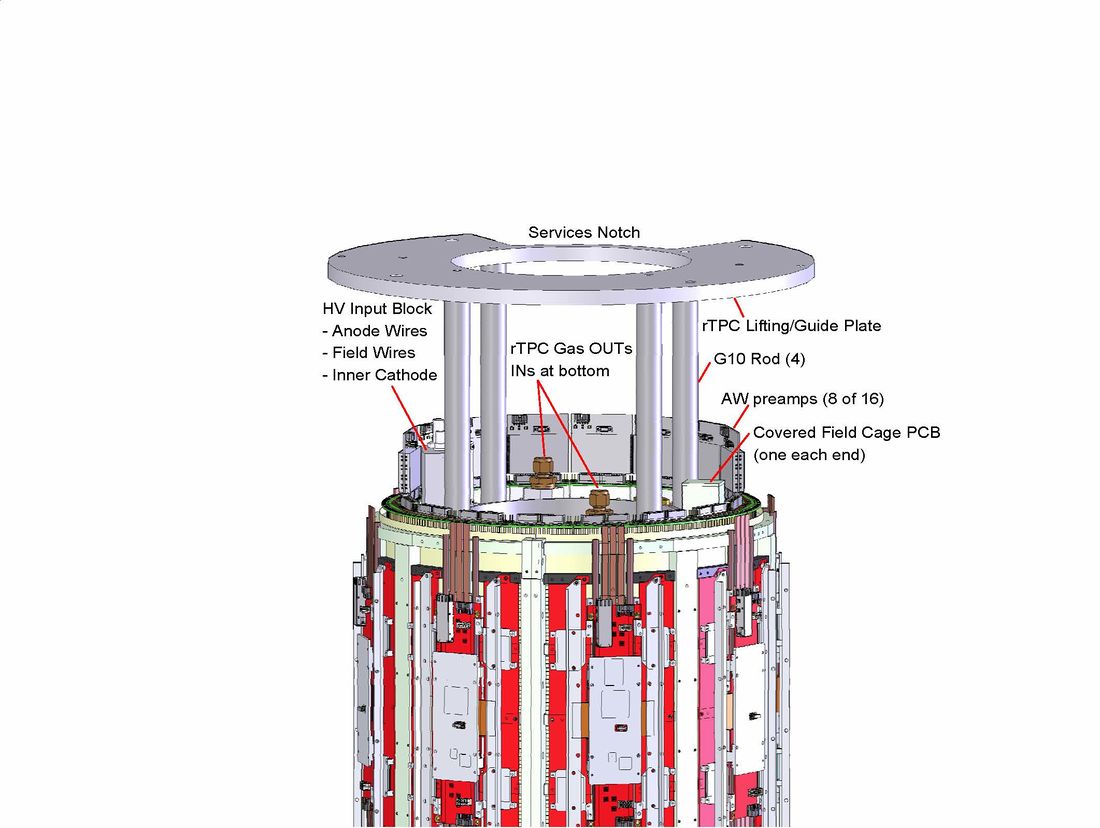
Figure 15 - Shows bottom end of rTPC and Barrel Scintillators. Anode cards (AC and AWC). rTPC and BV readout cables from bottom end go up through ‘gaps’. rTPC aligned and rests on plate. The G10 guide tubes allow temporary StainlessSteel rods to be inserted to lift (install remove) rTPC+Barrel Scintillators. The Detector assembly is aligned, supported, and isolated using usual 3-point system (Cup, Groove and Flat). Five polyflo gas lines, eight Tygon BV air cooling hoses, and sixteen Tygon water cooling hoses pass through for cutouts in the Lift/align plate (not shown) and exit through the bottom of the magnet.
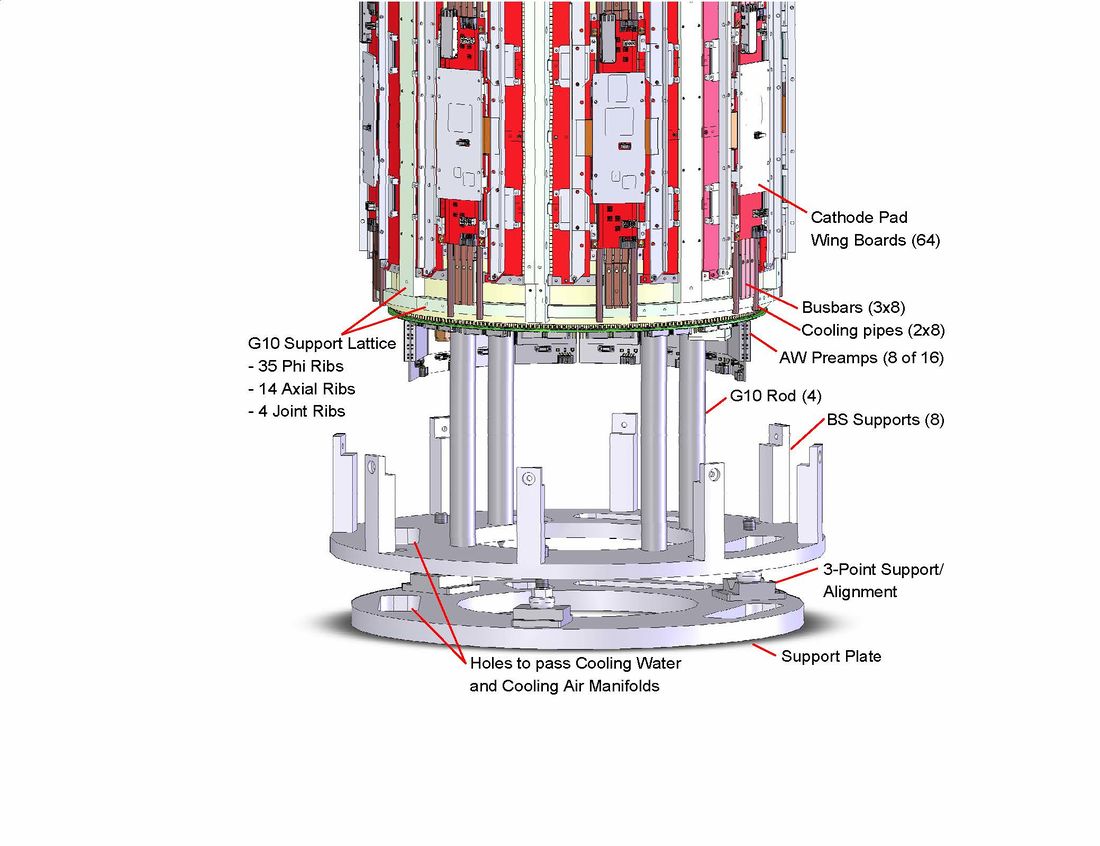
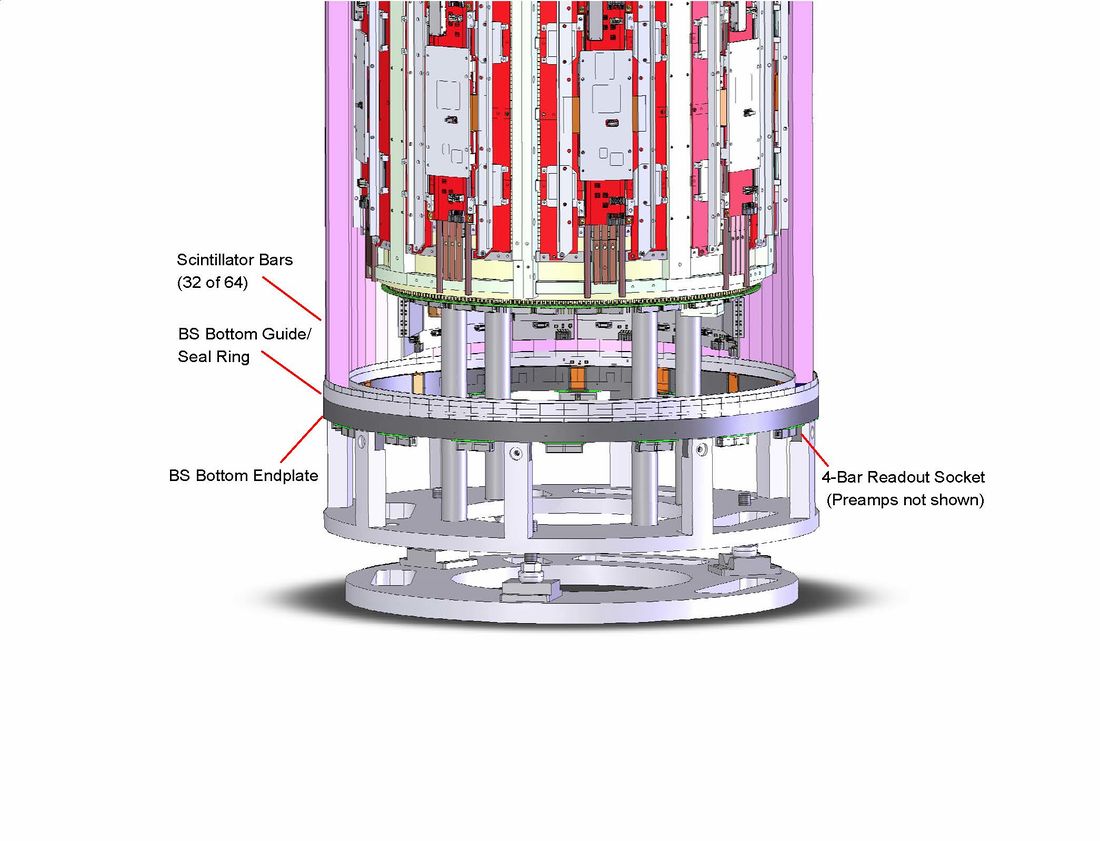
Figure 16 - Shows SolidWorks drawing of Bottom end of rTPC (Top) and rTPC+Barrel Scintillators (Bottom).
Figure 17 - Shows SolidWorks drawing of Top end of rTPC (Top) and rTPC+Barrel Scintillators (Bottom).
Figure 18 - Shows the final rTPC stringing stand, which is also the testing stand and shipping stand.
Scope
This document describes the mechanical concept, fabrication and assembly of the rTPC.
Definitions and Abbreviations
General acronyms or terms used for the ALPHA-g experiment
| rTPC | Radial Time projection Chamber |
|---|---|
| AD | Antiproton Decelerator (CERN building where ALPHA-g is installed) |
| Trap | Device where the Antihydrogen annihilation take place within the cryostat. |
Table 1 – ALPHA-g Abbreviations
Project plan Appendix IV drawing list
Design
The rTPC design is a radial drift chamber. Figure 1 shows a section view of the design. The Inner G10 Cylinder provides the structural support for the wire load. It is covered with a Cu/Mylar foil to act as the Inner Cathode at –HV (~4kV at R109.9mm). For the short prototype an existing 3mm thick G10 cylinder was available and used (machined length 376.6mm). For the full rTPC a company fabricated three 5.0mm thick G10 cylinder sections, which we machined glued together to make the 2,392.6mm cylinder. The Anode wire plane consists of 256 30um diameter Au/W wires at R182.0mm. A field wire plane is required to stabilize the Anode wires and define the gain region. They are at R174.0mm. For the prototype these were 75um Au/Be-Cu, but changed to 152um Au/Al for the final detector to reduce their electrostatic deflection and surface field (see Section 6.2.2). The Outer cathodes are at ground and are made from two half-cylinders. These half-cylinders are made from 0.5mm thick Cathode PCBs,1 per half-cylinder for the prototype, 8 for the full detector. These PCBs are kept in the half-cylinder shape by a lattice of G10 Phi ribs and Axial ribs (see Section 6.2.1). There are 32 Cathode strips in Phi. The Inner surface of the cathode strips is at R190.0mm, so there is 8.0mm from Anodes to pads and Anodes to Field wires.
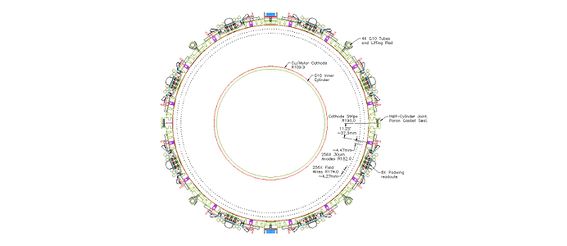 Figure 1 - Section view of the rTPC design.
Inner cylinder
The central cylinder provides the support structure of the rTPC for the wire tension load. It also holds the main high voltage cathode for the radial electrical field setting. Figure 2 shows the G10 Inner Cylinder. Due the length of the detector (~2400mm), the inner cylinder is made from three ~805mm long sections, glued together with 10mm long step joints. On this cylinder Cu/Mylar foil is glued to provide the Inner Cathode surface at -ve HV for the rTPC 64.8mm drift region. This foil is trimmed to tabs at the ends. The 12.7mm Cu/G10 endplates are glued to the cylinder, with the Inner Cylinder and foil tabs protruding 6.6mm beyond the endplates for electrical connections. Nine 6mm wide Aluminum strips (pitch 265mm) are on top of the Copper to act as target for the four 266nm lasers. The laser pulses cause pulses of electrons from the strips, these drift to the Anodes providing a drift-time calibration.
On the inner surface of the Inner Cylinder, a second Cu/Mylar sheet provides the main high-level electrical ground return connecting the two ends of the rTPC and also provides significant Faraday shielding. The inner cylinder assembly is complete (see picture Figure 4).
Figure 2 - The G10 Inner Cylinder. Cu/Mylar foil is glued onto it to provide the Inner Cathode surface. Nine 6mm wide Aluminum strips (pitch 265mm) are on top of the Copper to act as targets for the four 266nm lasers.
End plates
At the rTPC ends are 12.7mm thick Cu/G10 discs. These support and position the crimp pins for the field and anode wires. One of the End Plates is shown in Figure 3.
On its Inner surface, each End Plate has a PCB with concentric conductive rings. By using an external resistor chain, these rings properly close the boundary electric field between the inner cylinder and the field wires. The necessary services for the high voltage, gas feed, ground return, field and anode wires connections, etc. are mounted on the outer surfaces of the end plates. In ALPHA-g, accessibility to the ends of the rTPC are reduced especially the bottom ends. The HV supply lines are connected to the top end plate.
The bottom end of the rTPC connects to a support/alignment system. Anode signal/service cables come off both ends. There are two gas Inlet lines, and a pressure
sensor line (all 0.25” polyflow) connected to the bottom end plate. Two 0.375” polyflow gas Outlet lines are connected to the top end plate. These loop 180-degrees and pass outside the rTPC to the bottom end, where all five lines exit the magnet. Sixteen Kapton-coated copper strips (shown Figure 2) connect the Endplate grounds to the Outer half-cylinder grounds. There are also sixteen ground connections (not shown) at each Endplate to the inner cylinder faraday shield. The design of the end plates for the final detector are identical to the prototype ones.
The Endplates have been fabricated and aligned and glued to the Inner Cylinder. This assembly has been mounted on the stringing/testing stand. Figure 4 shows a picture of this in the Detector Facility large clean room, stringing has just started.
Figure 3 - End plates, both side visible. High Voltage box (grey), HV resistor chain box cover (green), concentric field-cage rings (Inner surfaces, red), gas fitting, ground strips joining semi-cylinder to end plates.
Figure 4 - This shows the rTPC (without outer Half-cylinders), in the clean room.
Outer Half-Cylinders
Two outer half-cylinders close the rTPC gas volume. They form the outer surface of the gain region and provide induced pulse detection on its pads. Longitudinal and Phi G10 ribs form a web support to maintain their shape and support the pad readout electronics. Figures 5 shows the SolidWorks model (with Pad electronics) of the Prototype. At the ends there is a 45mm of ground with no pads (25mm inside endplate), because the end regions of the rTPC have poorer drift fields. The full rTPC has eight times the pad region (8x288=2.304mm) and the same 45mm end ground regions, for a total of 2,394mm. Figure 6 shows the prototype (without Pad Electronics). Figure 7 shows a picture of the prototype, without the readout electronics.
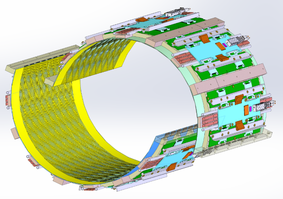 Figure 5 - Half cylinder model (prototype.)
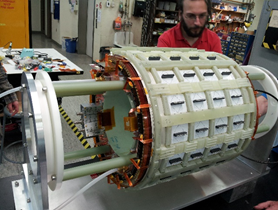 Figure 6 - Assembled prototype rTPC.
The fabrication of the two outer shells in the case of the full detector required a mandrel over 8 times the prototype length and many different parts to help the overall assembly. This mandrel jig has been fabricated and is being used. The SolidWorks model of the outer half-cylinder mandrel is shown in figure 7 and pictures of it in Figure 8.
 Figure 7 - SolidWorks model of the Outer half-shell mandrel.
The outer mandrel requires extra rigidity which is provided by a ~6.6” OD steel inner cylinder support with supporting rings. This mandrel is used for the gluing of the eight segments of the outer 0.5mm thick cathode pad PCBs, and the radial and longitudinal ribs that maintain the pad board curvature and make the structure of the outer half-shell. Once the pad boards are placed on the mandrel, the gluing process is to be done in four gluing steps. For two of these gluing steps, the mandrel needs to be kept rotating during the curing period, to ensure the glue doesn’t ‘pool’. This slow rotation (~1 RPM) is applied by a motor and gearbox on the main mandrel shaft. This gluing operation is repeated for the second half-cylinder.
File:Imagemechanic9.jpg File:Imagemechanic10.jpg
Figure 8 - Left: Picture of a partial assembly of G10 frame (plus four of the 9 jig clamp bars). Right: Mandrel with the 8 PCBs positioned and clamped with stainless bands.
Wire Sizes
The calculated (Garfield) Anode and Field wire deflections versus the Field wire voltage of the rTPC Prototype are shown in Figure 9. Because of the short wire length (350.5mm), the deflections are very small. For zero Anode wire deflection, the Field wire voltage is approx. -470 volts and the Field wire deflection ~15um.
Figure 9 - Electrostatic deflections of Anode wires (30um Au/W 85gm tension) and Field Wires (75um Au/Be-Cu 120gm tension) for the Prototype rTPC, wire length 350.5mm.
The prototype operating point (Vanode=+3,200V, Vcathode= -4,000V and Vfield=-400V) was found to be higher than expected (Garfield is poor at calculating gain). This resulted in the surface Field on the Field wires at ~37kV/cm, which is uncomfortably high. For this reason we decided to change the Field wire diameter to 152um for the full detector.
Figure 10 - Deflections of Anode wires (30um Au/W 130gm tension) and Field Wires (152um Au/Al 400gm tension) for the Full rTPC, wire length 2,366.5mm.
The calculated (Garfield) Anode and Field wire deflections versus the Field wire voltage of the full rTPC are shown in Figure 10. Because of the much longer wire length (2,366.5mm), the deflections are naturally much larger. The expected operating point is (Vanode=+3,200V, Vcathode= -4,000V and Vfield=-160V) and the deflections ~83um for the Anodes and ~166um for the Field wires, both outwards. At this point the Anodes are maintained halfway between the Field wires and the Outer cathode. The field on the Field wires is now a conservative 16.6kV/cm. In ALPHA-g the rTPC is vertical, so gravitations sags don’t apply. If bench tested horizontally, the gravitational deflections are ~52um for the Anodes and ~84um for the Field wires, which are also small.
The wire tensions will also be increased for the full detector. Instead of 85g on the Anodes, we will use 130g. The Field wires go from 120g for the 75um Au/W to 400gm for the 152um Au/Al.
Wire Tests
Figure 11 Shows multiple stress-strain tests for samples of 30um Au/W-Rh wire (top) and 152um Au/Al (5056). The red and gray lines show the expected stress-strain for those materials. From these we decided on conservative maximum wire tensions for the Anodes of 120gm, and for the field wires 400gm.
Figure 11 - Shows multiple stress-strain tests for samples of 30um Au/W-Rh wire (top) and 152um Au/Al (5056). The red and gray lines show the expected stress-strain for those materials.
Wire deflections are proportional to the wire weight/cm and inversely to the wire tension. So Au/Aluminum is a much better choice for the larger Field wires, a 3.3 density advantage. To use Au/Be-Cu and maintain the same deflections, the Field wire tensions would need to be ~1.3kg, dramatically increasing the Field wire tension load on the endplates from 102.4kg to 338.0kg.
Gas Services
Gas Inlets – Two 0.25” Polyflo connections to bottom end
Gas Outlets – Two 0.375” Polyflo connections to top end, these will loop back to the bottom end
Gas pressure port – One 0.25” Polyflo at bottom end, for rTPC pressure monitoring.
These five gas lines will exit from the bottom of the magnet to a gas system on the nearby platform. One of the holes in the bottom rTPC+Barrel Scintillator support/alignment piece and thru the system support plate is to exit these five polyflow lines (see Figure 16).
Gas Mixture
Figure 12 - Shows sample of Garfield Gas studies. Top - Drift velocities vs Electric Field. Bottom - Drift from Inner Cathode for 1 Tesla Magnetic field.
We have done considerable Garfield simulations of the radial drifting of electrons in the rTPC. Figure 12 shows samples. We have chosen to use Ar-CO2 70:30.
HV Drift Services
Individual High Voltage feeds to the 3 main components:
- Inner cathode wall (UHV Negative -4.0 kV)
- Field wires (SHV Negative -400 volts prototype, -160 volts full rTPC )
- Anode wires (SHV Positive +3.2 kV)
All the HVs are applied at the top end plate of the rTPC. Small resistor chain PCBs are mounted on each end plate and protected in G10 housings. These provide the voltages for the five Copper rings of end field-cage PCBs (Inside face of Endplates see Figure 3). The system maintains the correct voltages even if the Field wire voltage is adjusted. Keeping resistor 7 small ensures the Field wire supply is always delivering current (Bertans shut down if opposite current is required). The resistor chain current draws are ~2x25.7=51.4uA for the for Cathode supply and ~2x86.3=172.6 uA for the Field wire supply. Figure 13 shows a schematic of these resistor PCBs.
Figure 13 - Shows Resistor Chain PCB that provides the voltages for the end field-cage PCBs (mounted on inside face of Endplates).
Cooling Services
There are 3 different cooling systems, all of them come from the bottom of the rTPC.
Dry Air cooling channeled from the bottom of the magnet flush the outer surface of the rTPC and both end plates to prevent humidity build-up and for anode wire pre-amp cooling.
Dry Air cooling is flowed over the SiPM detectors at both ends of the barrel Scintillator bars to keep their temperature around 10 to 15°CC. Two inlet and two outlet hoses provide this cooling air to each of the enclosures at the barrel Scintillator ends. These hoses are 0.25” ID, 0.5” OD Tygon. These four inlet and four outlet hoses exit at the bottom of the magnet to a dual-manifold. The cooling air is supplied by a Vortex cooler.
There are eight water cooling loops for the pad electronics readout on the outer surface of the rTPC. The conduction is through sixteen straight 0.25” OD copper pipes glued to 128 Aluminum brackets. Tygon hose loops connect pairs of pipes at the top end, each cooling loop has a Tygon inlet and outlet hose at the bottom end. These hoses are 0.25” ID, 0.5” OD Tygon. These eight inlet and eight outlet hoses exit at the bottom of the magnet to inlet and outlet manifolds. The manifolds connect to a cooling system on the nearby platform.
Anode Electronics
Each anode wire is biased with the positive Anode-HV from the top end. Both ends of each wire are capacitively coupled to the anode pre-amplifier (in this document the coupling cards are called AC, their official designation is AWC, the amplifier cards are called AWC in this document, but officially designated AWB cards). The AC cards are mounted and screwed onto the end plates, the AWC cards plug into the ACs. The passive support card (AC) holds Mill-Max sockets that connect to the anode-wire crimp pins, the decoupling circuit, and the HV distribution. The AC and AWC handle 16 consecutive wires. Power, analog signals, and test pulse are provided to each 16-channel AWC card individually. Each anode wire is read out from both ends, for a total of 256 anode wires 8.0mm from the outer radius of the two end plates, a total of 32 AWC and 32 AC cards are required to cover the top and bottom anode signals. The Field wires can also be collectively pulsed, and this capacitively induces a negative test pulse on all anode wires and Cathode pads. This pulse on the anode wires checks the full readout train.
Pad Electronics
The inner surface of the Outer cathode (facing the anode wires) is segmented to provide position information. Each of the pads is read out independently through electronic circuits mounted on the outer surface of the outer half-cylinders. Due to the pad density, a special 72-channel ASIC chip (AFTER) is reading out 36 consecutive 4.0mm pads in Z from 2 channels in Phi. Readout Electronics will convert and collect the digital information by groups of 288 pads (4 ASICs). Each vertical rTPC sector requires 8 groups of 288 pads (4 groups on each half-cylinder) for a total of 2,304 pads. Eight 288mm long vertical sector PCBs are assembled to make up the full outer half-cylinder length. The overall rTPC length is composed of 8 vertical sectors, therefore a total of 18,432 pads are required for 2,304mm of active rTPC length.
rTPC Support Structure
In the experiment, the rTPC detector is supported on its own four 1.0” diameter G10 rods to the main alignment plate. This plate is aligned, supported and electrically isolated from 3-point support (for accurate positioning) to a lower support stand. The same alignment plate is used for the barrel scintillator support. This scheme permits the assembly of the rTPC and the Barrel Scintillator to be completely independent. Figures 14 and 15 show section details from Autocad. Figure 16 and 17 show SolidWorks 3D drawings.
Figure 14 - Shows top end of rTPC and Barrel Scintillators. Anode cards (AC and AWC), HV enclosure for Vc, Va, and Vfw. rTPC and BV readout cables from bottom end come up through ‘gaps’. All HV, power, and RO services exit the magnet (top-right) though a 50mm Z-gap in a sector facing the nearby platform. The four top-end BV cooling hoses pass down through gaps to exit at the bottom end.
Figure 15 - Shows bottom end of rTPC and Barrel Scintillators. Anode cards (AC and AWC). rTPC and BV readout cables from bottom end go up through ‘gaps’. rTPC aligned and rests on plate. The G10 guide tubes allow temporary StainlessSteel rods to be inserted to lift (install remove) rTPC+Barrel Scintillators. The Detector assembly is aligned, supported, and isolated using usual 3-point system (Cup, Groove and Flat). Five polyflo gas lines, eight Tygon BV air cooling hoses, and sixteen Tygon water cooling hoses pass through for cutouts in the Lift/align plate (not shown) and exit through the bottom of the magnet.
Figure 16 - Shows SolidWorks drawing of Bottom end of rTPC (Top) and rTPC+Barrel Scintillators (Bottom).
Figure 17 - Shows SolidWorks drawing of Top end of rTPC (Top) and rTPC+Barrel Scintillators (Bottom).
rTPC Transport and Testing Support Structure
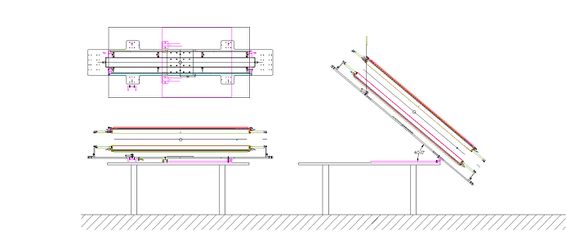 The final rTPC stringing stand is shown in Figure 18. It is similar to the prototype stand shown in Figure 6 picture, but much longer. We wanted the option of rotating the detector to the vertical for some tests and possibly for wire replacement without opening. The stand therefore has a plate that is clamped to a table and is hinged to the stand baseplate. The crane is used for the rotation and two struts installed when vertical. Two chains (green) are there to prevent over-rotation. This system is complete and has been tested without the rTPC.
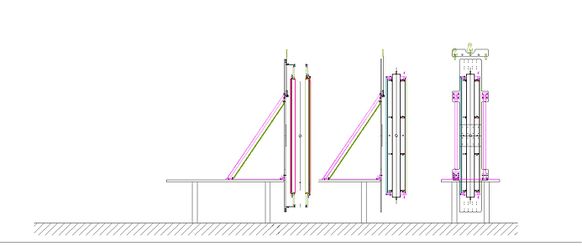 Figure 18 - Shows the final rTPC stringing stand, which is also the testing stand and shipping stand.
While the support structure is designed for the final placement of the detector in the Alpha-g experimental area, it is necessary to have a testing and transport infrastructure to carry the rTPC. This structure is to provide a convenient means for rotation of the detector from horizontal to vertical position. The anchorage of the tilting device has been designed to minimize the laboratory requirements, therefore local testing is reduced and packaging for shipment to CERN is also simplified.
Safety and Hazard Considerations
The usual HV hazard – No exposed HV
Chamber Gas – The Ar/CO2 mixture presently used is non-flammable. In the future flammable mixtures might be considered. Usual TRIUMF gas safety rules.
Lifting – Usual TRIUMF crane safety rules.
Wire breakage in rTPC – Always a small risk, especially for the thinner Anode wires. The choice of 30um Anodes wires rather than the usual 20um, and a conservative tension of 120gm greatly reduces this risk (See Section 6.5). The 400gm wire tension for the 152um Field wires is similarly conservative and their breakage risk is even less. The low number of wires, 512 total, makes this risk quite low compared with other chambers, such as the BaBar drift chamber that has more than 67,000 wires. The tilting/rotating system of the stringing/testing stand allows us to attempt to replace a broken wire without opening the rTPC. If done carefully this procedure (used with Babar chamber), has a reasonable probability of success. If it fails the rTPC can be opened, since the Outer Half-Cylinders are attached and sealed with removable RTV.
Wire slippage in rTPC crimp pins – Always a risk, but quite small. Wire tensions are monitored after stringing and wires with low tension, indicating probable slippage, are replaced. All wires are re-tested sometime later. Again, the low number of wires makes this risk quite low. If slippage occurs, the solution is replacement, the same as for a broken wire.
Wire Instability for Full rTPC – Only a small risk, the calculated wire deflections are small (~83um for Anodes and ~166um for Field wires). Unlike planar chambers, where the instability makes the wires ‘stagger’, at the operating point the wire deflections are always outwards. This reduces the likelihood of instability breakdown. In ALPHA-g the rTPC is vertical, so gravitational sags don’t apply. If bench tested horizontally, the gravitational deflections are ~52um for the Anodes and ~84um for the Field wires, which are also small.
Gas system – It is a simple one-pass design. Its design ensures failsafe shutdown in case of power loss and a bubbler ensures the detector cannot be over-pressured.
On rTPC Electronics Cooling Water System – This system operates at negative pressure. This greatly reduces the risk of water damage to the Electronics, rTPC and the Barrel Scintillators. Similar systems are used for many detector systems. Only risk is the need to shutdown electronics if it fails. Slow controls will do this automatically.
Cooling Air For SiPMs of Barrel Scintillators – This commercial system is external to solenoid. No significant damage risk, only SiPM performance worsens at room temperature.
Failure of rTPC and Barrel Scintillator support components – Low risk, the weights are low and the parts are strong. The 64 Barrel Scintillator have a total weight of only 80kg, and the rTPC weight is similar.

