Custom Page Features: Difference between revisions
No edit summary |
No edit summary |
||
| Line 28: | Line 28: | ||
{{Html|text=</script>}} | {{Html|text=</script>}} | ||
= Access the ODB with HTML-style ''<odb>'' tags = | |||
;NOTE | ;NOTE | ||
: It is recommended that the [[Mhttpd.js|MIDAS Javascript Library]] be used for ODB access. | : It is recommended that the [[Mhttpd.js|MIDAS Javascript Library]] be used for ODB access. | ||
However, if Javascript (JS) is not available, the older HTML-style ''<odb>'' tags are still available and provide limited functionality. | However, if Javascript (JS) is not available, the older HTML-style ''<odb>'' tags are still available and provide limited functionality. | ||
| Line 37: | Line 37: | ||
{| style="text-align: left; width: 100%; background-color: rgb(255, 255, 255);" border="3" cellpadding="2" cellspacing="2" | {| style="text-align: left; width: 100%; background-color: rgb(255, 255, 255);" border="3" cellpadding="2" cellspacing="2" | ||
|+ | |+ Access to ODB from HTML | ||
|- | |- | ||
| colspan="1" rowspan="1" style="text-align: center; vertical-align: top; background-color: rgb(204, 204, 255); font-weight: bold;" | HTML ODB tag | | colspan="1" rowspan="1" style="text-align: center; vertical-align: top; background-color: rgb(204, 204, 255); font-weight: bold;" | HTML ODB tag | ||
| Line 54: | Line 54: | ||
| Display an Editable ODB field (popup style). Optional password protection with '''pwd''' . | | Display an Editable ODB field (popup style). Optional password protection with '''pwd''' . | ||
|} | |} | ||
;NOTE | |||
: The Optional password protection with '''pwd''' (documented in the [http://ladd00.triumf.ca/~daqweb/doc/midas-old/html/RC_customize_ODB.html#RC_Access_Control| OldMidas Document]) may not be working. | |||
: Use the [[/Experiment ODB tree#Security subtree|Web Password security]] instead. | |||
| Line 64: | Line 68: | ||
See also [[Custom Page#How to write a Custom Page|HTML Custom Page example]]. | See also [[Custom Page#How to write a Custom Page|HTML Custom Page example]]. | ||
| Line 199: | Line 189: | ||
In the imagefile subtree {{Odbpath|path=myexpt.gif}}, create the STRING key {{Odbpath|path=Background}}, and set it to contain the path and name of the imagefile. The tree structure should then look similar to Figure 5, minus the labels/bars/fill subtrees which will be added to the ODB later. | In the imagefile subtree {{Odbpath|path=myexpt.gif}}, create the STRING key {{Odbpath|path=Background}}, and set it to contain the path and name of the imagefile. The tree structure should then look similar to Figure 5, minus the labels/bars/fill subtrees which will be added to the ODB later. | ||
The image must also be referenced in the custom HTML file ''myexpt.html'' | The image must also be referenced in the custom HTML file ''myexpt.html'' in the "src" field of an HTML <img...> tag, e.g. | ||
{{Html|text=<img src="myexpt.gif">}} | {{Html|text=<img '''src="myexpt.gif"'''>}} | ||
== Inserting a history image == | |||
In the special case where the image to be inserted is a History image, it can be inserted into a custom page using an HTML <img...> tag of the following form: | |||
{{Html|text=blah<img src="http://hostname.domain:port/HS/Meterdis.gif&scale=12h&width=300">}} | |||
== HTML mapping == | |||
Note that if additional features such as active clickable areas and labels, bars and fills superimposed on the image are also required, HTML mapping must also be activated with the HTML <map...> tag and the "usemap" attribute of the HTML <img> tag | |||
{{Html|text= <map '''name="myexpt.map"'''> <br> <img src="myexpt.gif" '''usemap="#myexpt.map"'''> <br>...<br> </map>"}} | |||
== Display mouse position == | |||
[[File:Cursor.png|thumbnail|left|Figure 9: MEG Gas System Custom Page showing cursor position]] | |||
When writing custom pages with large background images and labels and fills placed on that image, it is hard to figure out X and Y coordinates of the labels. This can now be simplified by setting the "id" attribute of the background HTML <img...> tag to "refimg", e.g. | |||
<div style="background-color:floralwhite; color:seagreen; font-style:italic"> | |||
: <img '''id="refimg"''' src="ebit_pc.gif" usemap="#Custom1"> <!-- name="refimg" makes crosshairs appear --> | |||
: <map name="Custom1"> | |||
: ..... | |||
: </map> | |||
</div> | |||
The function getMouseXY in the JavaScript built-in library [[Mhttpd.js]] supplies the X,Y position if an element of ID refimg is present. Therefore, the JS library must be included. | |||
If the "refimg" tag is present, the cursor changes into a crosshair, and its absolute and relative locations in respect to the reference image are shown in the status bar (Figure 9). | |||
<div style="clear: both"></div> <!-- clear wraparound after thumbnail --> | <div style="clear: both"></div> <!-- clear wraparound after thumbnail --> | ||
== Superimposing Labels, Bars and Fills onto an image == | == Superimposing Labels, Bars and Fills onto an image == | ||
| Line 215: | Line 228: | ||
* bars : "bar level" showing graphically ODB values such as levels or rate etc. | * bars : "bar level" showing graphically ODB values such as levels or rate etc. | ||
* fills : "color level" where colour is used as the level indicator. | * fills : "color level" where colour is used as the level indicator. | ||
Each entry (label/bar/fill) will have an ODB tree associated to it defining the ODB variable path, X/Y position, colour, etc. Each time the page is updated, the latest ODB value/level/rate will be shown based on the ODB parameter to which the label, bar or fill is linked - hence the term "live". The overlay of the requested features is done onto the selected image file. | Each entry (label/bar/fill) will have an ODB tree associated to it defining the ODB variable path, X/Y position, colour, etc. Each time the page is updated, the latest ODB value/level/rate will be shown based on the ODB parameter to which the label, bar or fill is linked - hence the term "live". The overlay of the requested features is done onto the selected image file. | ||
| Line 223: | Line 235: | ||
;Note | ;Note | ||
: Be sure to enable the feature to [[#Display mouse position]] in order to facilitate finding the X,Y positions of the various features. | : Be sure to enable the feature to [[#Display mouse position]] in order to facilitate finding the X,Y positions of the various features. | ||
: [[#HTML mapping]] must be activated for labels/bars/fills to work | |||
A Demo custom page showing labels,bars and fills superimposed on an image is shown in [[Custom Page#How to write a custom page|Figure 4]]. The file [http://ladd00.triumf.ca/~daqweb/doc/midas/doc/html/xcustom_8odb_source.html xcustom.odb] | A Demo custom page showing labels,bars and fills superimposed on an image is shown in [[Custom Page#How to write a custom page|Figure 4]]. The file [http://ladd00.triumf.ca/~daqweb/doc/midas/doc/html/xcustom_8odb_source.html xcustom.odb] | ||
contains the ODB keys required, including those to insert the image and superimpose the various labels, fills etc. | contains the ODB keys required, including those to insert the image and superimpose the various labels, fills etc. | ||
In order to include a readout of ODB values (i.e. labels), on the image a further ODB subdirectory {{Odbpath|path= | === Adding Labels === | ||
[[File:Mhcustom_label.jpg|thumbnail|left|Figure 6: /Custom/Images/Labels ODB subtree]] | |||
In order to include a readout of ODB values (i.e. labels), on the image, a further ODB subdirectory {{Odbpath|path=/Custom/images/<imagefile.gif/Labels}} must be created. Creating a subdirectory for a particular label i.e. {{Odbpath|path=<label name>}} in the {{Odbpath|path=Labels}} subtree will, at the next custom web page refresh, cause the complete structure for that label to be created and filled with default values. Once the {{Odbpath|path=<label name>}} subtree is created, the user fills the various keys as desired. See [[/Custom ODB tree#Labels subtree]] for details of the various fields. This procedure is repeated for all the labels required, using a unique {{Odbpath|path=<label name>}} subdirectory for each label. An example of a {{Odbpath|path=<label name>}} subtree is shown in Figure 6. | |||
<div style="clear: both"></div> <!-- clear wraparound after thumbnail --> | |||
=== Adding Bars === | |||
[[File:Mhcustom_fill.jpg|thumbnail|left|Figure 7: /Custom/Images/Fills ODB subtree]] | |||
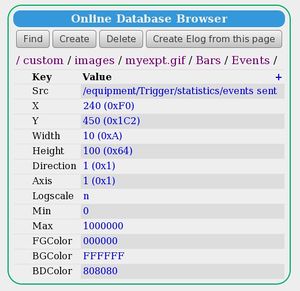
In a similar way, Bars can be superimposed on the image. Create a new ODB subdirectory {{Odbpath|path=/Custom/images/<imagefile.gif/Bars}}. Create a subdirectory for a particular Bar ({{Odbpath|path=<bar name>}}) in the {{Odbpath|path=Bars}} subdirectory. Refresh the web page and fill the various keys as desired. See [[/Custom ODB tree#Bars subtree]] for details of the various fields. Examples of a <bar-name> subtree is shown in Figures 7. | |||
<div style="clear: both"></div> <!-- clear wraparound after thumbnail --> | |||
=== Adding Fills === | |||
[[File:Mhcustom_bar.jpg|thumbnail|left|Figure 8: /Custom/Images/Bars ODB subtree]] | |||
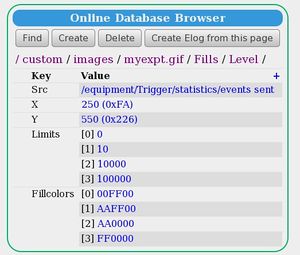
In a similar way, Fills can be superimposed on the image. Create new ODB subdirectory {{Odbpath|path=/Custom/images/<imagefile.gif/Fills}}. Create a subdirectory for a particular Fill ({{Odbpath|path=<fill name>}}) in the {{Odbpath|path=Fills}} subdirectory. Refresh the web page and fill the various keys as desired. See [[/Custom ODB tree#Fills subtree]] for details of the various fields. Examples of a <fill-name> subtree is shown in Figures 8. | |||
<div style="clear: both"></div> <!-- clear wraparound after thumbnail --> | |||
== Mapping active areas onto the image == | |||
Provided [[#HTML mapping]] is activated, "clickable" areas can be created on the image. | |||
This can be done now with a new function like this: | |||
{{Html|text= <area shape="rect" coords="40,200,100,300" alt="Main Valve" href="Custom1?cmd=Toggle&odb=/Equipment/Environment/Variables/Output[2]">}} | |||
This defines a clickable map on top of the custom image. The area(s) should match with some area(s) on the image, e.g. the box of a valve. Determining the co-ordinates of this area is simplified by using the Display mouse position feature. | |||
By clicking on this area, the supplied path to the ODB is used (in this case {{Odbpath|path=/Equipment/Environment/Variables/Output[2]}}) and its value is toggled. If the valve value is then used in the image via a [[#Adding Fills|Fill]] statement to change the color of the valve, it can turn green or red depending on its state. This is illustrated in Figure 9. | |||
Clicking an active area can also be made to open a new custom page, for example: | |||
{{Html|text=<area shape=rect coords="687,530, 890,648" alt="Pump detail" href = "Pump!" title="Click for Details">}} | |||
{{Html|text=<area shape=rect coords="560,574,775,662" alt="Buffer Tank detail" href = "BufferTank!" title="Click for Details">}} | |||
where ''Pump!'' and ''BufferTank!'' are defined as links to custom pages in the [[/Custom ODB tree]]. | |||
== Edit boxes floating on top of a graphic == | |||
An edit box can be placed on top of a graphic in a particular position by means of an HTML <div> tag. Using the ODBEdit function from the Midas JS library [[Mhttpd.js]], the custom page code would look like this: | |||
<!-- Complicated... have to use <pre> because of <div>, then a table to keep the background colour between <pre>s --> | |||
{| style="text-align: left; width: 100%; background-color: floralwhite;" border="0" cellpadding="1" cellspacing="1" | |||
|- | |||
|<pre style="background-color:floralwhite; color:seagreen; font-style:italic"> | |||
<div style="position:absolute; top:100px; left:50px;"> | |||
<script type="text/javascript"> </pre> | |||
<pre style="background-color:floralwhite; color:steelblue; font-style:italic;"> | |||
document.write('Run number: ') | |||
path='/runinfo/run number' | |||
rn = ODBGet(path) | |||
document.write('<a href="#" onclick="ODBEdit(path)" >') | |||
document.write(rn) | |||
document.write('</a>');</pre> | |||
<pre style="background-color:floralwhite; color:seagreen; font-style:italic;"> | |||
</script> | |||
</div> | |||
<img src="custom.gif"> | |||
</pre> | |||
|} | |||
The same thing could be done with the HTML-style <odb> tag : | |||
<pre style="background-color:floralwhite; color:seagreen; font-style:italic"> | |||
<div style="position:absolute; top:100px; left:50px;"> | |||
Run number: <odb src="/Runinfo/run number" edit=1> | |||
</div> | |||
<img src="custom.gif"> | |||
</pre> | |||
Revision as of 01:44, 2 October 2014
Links
Introduction
This page describes some of the special features provided for use on a user-created Custom Page#Custom Web Page running under mhttpd.
Access the ODB with the MIDAS Javascript Library
Access to the ODB is provided by the MIDAS Javascript Library. JS Library functions can be included in the HTML code using the <script> tag, e.g.
- <script>
- document.write ('Experiment Name: '+ ODBGet("/Experiment/Name"))
var alarm_path="/alarms/Alarm system active";
var alarm_active=ODBGet(alarm_path);
document.write('<a href="#" onclick="ODBEdit(alarm_path)" >'+alarm_active+'</a>')
- </script>
Access the ODB with HTML-style <odb> tags
- NOTE
- It is recommended that the MIDAS Javascript Library be used for ODB access.
However, if Javascript (JS) is not available, the older HTML-style <odb> tags are still available and provide limited functionality.
The HTML-style <odb...> tag has been defined for read/write access to the ODB under HTML. The <odb...> tags are declared within enclosing HTML <form...>....</form> tags.
| HTML ODB tag | Meaning |
| <odb src="odb path"> | Display ODB field (read only) |
| <odb src="odb path" edit=1 pwd="CustomPwd"> | Display an Editable ODB field (inline style). Optional password protection with pwd . |
| <odb src="odb path" edit=2 pwd="CustomPwd"> | Display an Editable ODB field (popup style). Optional password protection with pwd . |
- NOTE
- The Optional password protection with pwd (documented in the OldMidas Document) may not be working.
- Use the Web Password security instead.
<odb> tags are included in the HTML code e.g.
- Experiment Name: <odb src="/Experiment/Name">
Run Number: <odb src="/runinfo/run number" edit=1>
See also HTML Custom Page example.
Json support
Json support is provided with the MIDAS Javascript Library.
Access to the MIDAS Menu buttons
Access to the standard MIDAS Menu buttons can be provided with HTML <input...> tags of the form:
- <input name="cmd" value=<button-name> type="submit" >
Valid values are the standard MIDAS Menu buttons, i.e. (Start, Pause, Resume, Stop, ODB, Elog, Alarms, History, Programs etc). The <input...> tags must be declared within enclosing HTML <form...>....</form> tags (see above).
The following HTML fragment shows the inclusion of three of the standard buttons, giving access to the Main Status, ODB and Messages pages :
- <form name="form1" method="Get" action="/CS/MyExpt&">
<input name="cmd" value="Status" type="submit">
<input name="cmd" value="ODB" type="submit">
<input name="cmd" value="Messages" type="submit">
...
</form>
CustomScript Buttons
CustomScript buttons can be provided on Custom Pages. These buttons are equivalent to optional script buttons on the Status Page, and allow a particular action to be performed when the button is pressed. Customscript buttons can be set up through the /Customscript ODB tree.
Any key /CustomScript/my button will appear as a customscript-button my button on a custom page whose code includes an HTML <input...> tag of the form:
<input type=submit name=customscript value="my button">
where the action of the button my button will be found in the /customscript/my button subdirectory.
After pressing a customscript-button, the Status Page will be shown, unless a redirect input tag is included to redirect back to the original custom page.
External stylesheet
A stylesheet can of course be included in an HTML page. However, it is often convenient to use an external stylesheet that can be used for several custom pages. The MIDAS packate provides a condensed stylesheet (mhttpd.css) for users who would like their custom pages to have a similar "look and feel" to that of the the standard pages.
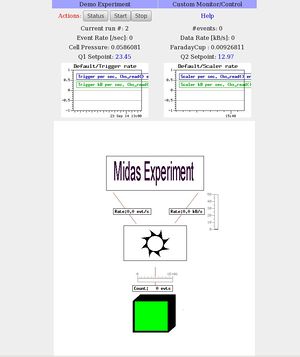
An external stylesheet can be used in a Custom Page by creating a link in the /Custom tree to a stylesheet file on the local disk. It is convenient to end the link name with "!" to prevent a custom-button appearing on the Status Page (see Keys in the /Custom tree). For example, the links for the Demo Custom Page myexpt.html and the style sheet mhttpd.css are shown using the ODB Page in Figure 1.
A <link> tag to link in the stylesheet is then placed in the header of the custom page html code (myexpt.html) e.g.
<link type="text/css" rel="stylesheet" href="/CS/stylesheet!" title="Stylesheet">
The resulting custom page is shown in Figure 1, which can be compared with Figure 4 (no stylesheet).
Alias-Buttons and Hyperlinks
Any hyperlink can easily be included on a Custom Page by using the standard HTML anchor <a...> tag, e.g.
<a href="http://ladd00.triumf.ca/~daqweb/doc/midas/html/">Midas Help</a>
Links on a custom page equivalent to alias-buttons can also be made e.g.
<button type="button" onclick="document.location.href='/Alias/alias&';">alias</button>
See the /Alias ODB tree for details.
Page refresh
The following <meta...> tag included in the HTML header code will cause the whole custom page to refresh in 60 seconds : <meta http-equiv="Refresh" content="60"> It is also possible to Periodic update of parts of a custom page#periodically update parts of a custom page.
Periodic update of parts of a custom page
The functionality of ODBGet together with the
window.setInterval() function
can be used to update parts of the web page periodically. For example the Javascript fragment below contains a function which updates the current run number every 10 seconds in the background:
 window.setInterval("Refresh()", 10000);
 function Refresh() {
   document.getElementById("run_number").innerHTML = ODBGet('/Runinfo/Run number');
 }
The custom page has to
- include the MIDAS JS library to access ODBGet
- contain an element with id="run_number", such as
Display last MIDAS message(s)
The message log (see Message System) can be accessed from a custom page using a call to the JavaScript library function ODBGetMsg (provided the JS library is included). There is no HTML equivalent to this JS function.
This allows the inclusion of the "Last Midas message" on a custom page, e.g.
- <script>
- var message;
message= ODBGetMsg(1);
document.write('Last message:'+message+'
');
- </script>
More messages may be displayed by increasing the parameter to ODBGetMsg.
Checkboxes
The function ODBSet (provided the JS library is included) can be used when one clicks on a checkbox for example:
- <input type="checkbox" onClick="ODBSet('/Logger/Write data',this.checked?'1':'0')">
If used as above, the state of the checkbox must be initialized when the page is loaded. This can be done with some JavaScript code called on initialization, which then uses ODBSet as described above.
Custom Status Page
By using a name of "Status" (no "&") in the custom page key name, that page will replace the default Status Page. Clicking on the Status button on any of the sub-pages will return to the Custom Status Page. To return to the default Status Page, delete the /Custom/Status link.
Image insertion
- Note
- The image file must be in gif format.
Click to enlarge thumbnail
Image insertion into a Custom page will be illustrated using the Demo custom page shown in Figure 4. It is assumed that a link to the Demo custom page file myexpt.html has already been made by defining the filepath in the /Custom ODB tree.
To make the image myexpt.gif visible on the custom page, the path and filename of the image file must be defined in the /Custom/images subtree.
Create the subtrees /Custom/images/myexpt.gif where the subtree name "myexpt.gif" is named for the imagefile you are going to use. Multiple images can be used, by creating multiple imagefile subtrees.
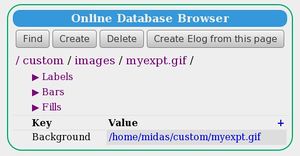
In the imagefile subtree myexpt.gif, create the STRING key Background, and set it to contain the path and name of the imagefile. The tree structure should then look similar to Figure 5, minus the labels/bars/fill subtrees which will be added to the ODB later.
The image must also be referenced in the custom HTML file myexpt.html in the "src" field of an HTML <img...> tag, e.g.
- <img src="myexpt.gif">
Inserting a history image
In the special case where the image to be inserted is a History image, it can be inserted into a custom page using an HTML <img...> tag of the following form:
- blah<img src="http://hostname.domain:port/HS/Meterdis.gif&scale=12h&width=300">
HTML mapping
Note that if additional features such as active clickable areas and labels, bars and fills superimposed on the image are also required, HTML mapping must also be activated with the HTML <map...> tag and the "usemap" attribute of the HTML <img> tag
- <map name="myexpt.map">
<img src="myexpt.gif" usemap="#myexpt.map">
...
</map>"
Display mouse position
When writing custom pages with large background images and labels and fills placed on that image, it is hard to figure out X and Y coordinates of the labels. This can now be simplified by setting the "id" attribute of the background HTML <img...> tag to "refimg", e.g.
- <img id="refimg" src="ebit_pc.gif" usemap="#Custom1">
- <map name="Custom1">
- .....
- </map>
The function getMouseXY in the JavaScript built-in library Mhttpd.js supplies the X,Y position if an element of ID refimg is present. Therefore, the JS library must be included.
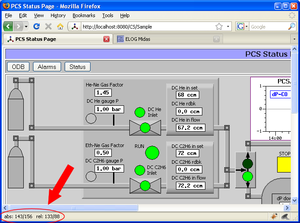
If the "refimg" tag is present, the cursor changes into a crosshair, and its absolute and relative locations in respect to the reference image are shown in the status bar (Figure 9).
Superimposing Labels, Bars and Fills onto an image
You can enhance your custom page by superimposing multiple features based on ODB variables onto an image, such as
- labels: "live" ODB values positioned in a particular location of the page
- bars : "bar level" showing graphically ODB values such as levels or rate etc.
- fills : "color level" where colour is used as the level indicator.
Each entry (label/bar/fill) will have an ODB tree associated to it defining the ODB variable path, X/Y position, colour, etc. Each time the page is updated, the latest ODB value/level/rate will be shown based on the ODB parameter to which the label, bar or fill is linked - hence the term "live". The overlay of the requested features is done onto the selected image file.
This powerful new extension brings the mhttpd capability closer to other experimental web controllers similar to EPICS.
- Note
- Be sure to enable the feature to #Display mouse position in order to facilitate finding the X,Y positions of the various features.
- #HTML mapping must be activated for labels/bars/fills to work
A Demo custom page showing labels,bars and fills superimposed on an image is shown in Figure 4. The file xcustom.odb contains the ODB keys required, including those to insert the image and superimpose the various labels, fills etc.
Adding Labels
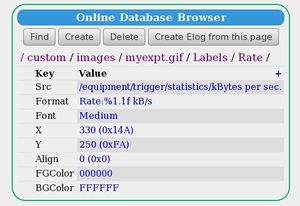
In order to include a readout of ODB values (i.e. labels), on the image, a further ODB subdirectory /Custom/images/<imagefile.gif/Labels must be created. Creating a subdirectory for a particular label i.e. <label name> in the Labels subtree will, at the next custom web page refresh, cause the complete structure for that label to be created and filled with default values. Once the <label name> subtree is created, the user fills the various keys as desired. See /Custom ODB tree#Labels subtree for details of the various fields. This procedure is repeated for all the labels required, using a unique <label name> subdirectory for each label. An example of a <label name> subtree is shown in Figure 6.
Adding Bars
In a similar way, Bars can be superimposed on the image. Create a new ODB subdirectory /Custom/images/<imagefile.gif/Bars. Create a subdirectory for a particular Bar ( <bar name>) in the Bars subdirectory. Refresh the web page and fill the various keys as desired. See /Custom ODB tree#Bars subtree for details of the various fields. Examples of a <bar-name> subtree is shown in Figures 7.
Adding Fills
In a similar way, Fills can be superimposed on the image. Create new ODB subdirectory /Custom/images/<imagefile.gif/Fills. Create a subdirectory for a particular Fill ( <fill name>) in the Fills subdirectory. Refresh the web page and fill the various keys as desired. See /Custom ODB tree#Fills subtree for details of the various fields. Examples of a <fill-name> subtree is shown in Figures 8.
Mapping active areas onto the image
Provided #HTML mapping is activated, "clickable" areas can be created on the image.
This can be done now with a new function like this:
- <area shape="rect" coords="40,200,100,300" alt="Main Valve" href="Custom1?cmd=Toggle&odb=/Equipment/Environment/Variables/Output[2]">
This defines a clickable map on top of the custom image. The area(s) should match with some area(s) on the image, e.g. the box of a valve. Determining the co-ordinates of this area is simplified by using the Display mouse position feature.
By clicking on this area, the supplied path to the ODB is used (in this case /Equipment/Environment/Variables/Output[2]) and its value is toggled. If the valve value is then used in the image via a Fill statement to change the color of the valve, it can turn green or red depending on its state. This is illustrated in Figure 9.
Clicking an active area can also be made to open a new custom page, for example:
- <area shape=rect coords="687,530, 890,648" alt="Pump detail" href = "Pump!" title="Click for Details">
- <area shape=rect coords="560,574,775,662" alt="Buffer Tank detail" href = "BufferTank!" title="Click for Details">
where Pump! and BufferTank! are defined as links to custom pages in the /Custom ODB tree.
Edit boxes floating on top of a graphic
An edit box can be placed on top of a graphic in a particular position by means of an HTML
<div style="position:absolute; top:100px; left:50px;">
<script type="text/javascript">
document.write('Run number: ')
path='/runinfo/run number'
rn = ODBGet(path)
document.write('<a href="#" onclick="ODBEdit(path)" >')
document.write(rn)
document.write('</a>');
</script> </div> <img src="custom.gif"> |
The same thing could be done with the HTML-style <odb> tag :
<div style="position:absolute; top:100px; left:50px;">
Run number:  <odb src="/Runinfo/run number" edit=1>
</div>
<img src="custom.gif">

