ODB Page
Links
Purpose
The purpose of the mhttpd ODB page is to allow the user to browse, search and edit the ODB of an experiment. This gives a user-friendly graphical alternative to the ODB editor odbedit.
Access the ODB page
Click image to enlarge

The ODB Page is accessed from the Status Page (or one of the other Pages) by clicking on the menu item ODB.
The top level ODB trees will be visible as key-links (i.e.links to a key) (Figure 1). The ODB Page is largely self-explanatory. However, a brief description of its functionality and limitations is given below.
- Note
- If "ODB" button is not present on the Status Page, it may have been hidden.
Browse the ODB


By clicking on the key-links on the ODB page (Figure 1), the user can browse the various subtrees (Figure 2a). By clicking on the "→" link adjacent to the "Value" heading (Figure 2b), the type and size of the keys are shown. This is equivalent to the odbedit commands ls and ls -l.
Change the value of an ODB key
By clicking on a Key Value link (Figure 2), the user can change the value (unless password-protected or the key is write-protected - see Security). If web access is restricted, the user will be asked for a password the first time he/she attempts to edit a value.
Create an ODB key
The user can create a new ODB key in a tree or subtree using the ODB Page by
- entering the appropriate directory (see #Browse the ODB)
- clicking the
 button (Figure 2).
This will result in a "Create ODB Entry box" pop-up (Figure 3).
Figure 3: Create an ODB Key (click a thumbnail to enlarge)
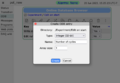
Figure 3a:
Create an integer
Figure 3b:
Create an array of string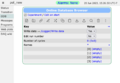
Figure 3c:
Created keys


The Type of key to be created is selected from the Type drop-down list (Figure 3a). Any of the data types supported by midas can be created (floats, integers, strings etc), including subdirectories and symbolic links.
1. Create a single value or array
Figure 3a shows the creation of a key of type Integer (32-bit). The type "Integer (32-bit)" has been selected from the Type drop-down list (Table 1 above). The name of the key "Number of cycles" has been filled in using the Name box. This key is not an array so the Array Size box has the default (1). The key is created by pressing the Create button on Figure 3a. The value of the key will be set to 0 when created. This has been changed to 10 in Figure 3c by clicking on the Key Value link .
Figure 3b shows the creation of a String Array. The type "String" has been selected from the Type drop-down list (Table 1 above). The Array size and String size boxes are set with the desired parameters. After pressing the Create button on Figure 3b, the resulting array is shown in Figure 3c. The values of the array elements are set to "Empty" when created. The array values can be set by clicking on the Key Value links.
2. Create a subdirectory or symbolic link
Create a subdirectory key by clicking the ![]() icon. Figure 4a shows the creation of
a subdirectory
Edit on start in the
/Experiment directory.
The subdirectory is created by pressing the
OK button on Figure 4a.
icon. Figure 4a shows the creation of
a subdirectory
Edit on start in the
/Experiment directory.
The subdirectory is created by pressing the
OK button on Figure 4a.
A symbolic link (or link) is a key which is a short-cut to another key in the ODB.
Create a link by pressing the ![]() icon.
Figure 4b shows the creation of
an edit-on-start parameter which is a symbolic link called "My link". The target of the link can be chosen either by typing in the text box, or by pressing the
... button, which will present an ODB "picker", as shown in Figure 4c. The resulting link is shown in Figure 4d.
icon.
Figure 4b shows the creation of
an edit-on-start parameter which is a symbolic link called "My link". The target of the link can be chosen either by typing in the text box, or by pressing the
... button, which will present an ODB "picker", as shown in Figure 4c. The resulting link is shown in Figure 4d.
Figure 4 Creating subdirectory or symbolic link (click to enlarge thumbnails)
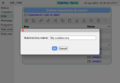
Figure 4a:
Create subdirectory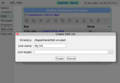
Figure 4b:
Create symbolic link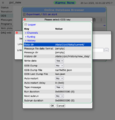
Figure 4c: Choose the target of the symbolic link
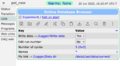
Figure 4d: Symbolic link has been created


Delete an ODB key

The user can delete a key using the ![]() icon. There are two usages of the icon:
icon. There are two usages of the icon:
- Click on the row of an ODB key and it will be highlighted in blue. Then click the
 icon. You will be prompted to confirm that you want to delete that key. You can select multiple keys by holding the Ctrl or Shift keys and clicking again (just like in your computer's file browser).
 - If you don't select any ODB keys before clicking the icon, you are saying you want to delete the entire subdirectory that you're currently in. You will be prompted to confirm that you want to delete everything in the current subdirectory.
You can also delete a key by right-clicking on a row and selecting "Delete key".
Search the ODB for a key
Click on the ![]() icon to find any keys in the entire ODB that match a given term. A pop-up (Figure 6a) appears in which the user types the relevant information. The results appear as shown in Figure 6b. Note you are searching for the key names, not the values.
icon to find any keys in the entire ODB that match a given term. A pop-up (Figure 6a) appears in which the user types the relevant information. The results appear as shown in Figure 6b. Note you are searching for the key names, not the values.
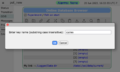
Figure 6a:
Enter search term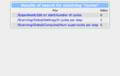
Figure 6b:
View search results


Reorder ODB keys in a subdirectory
You can enter "re-order" mode by clicking the ![]() icon. A
icon. A ![]() icon will then appear next to each ODB key, as shown in Figure 7. You can click and drag this icon to change the position of the key in the subdirectory.
icon will then appear next to each ODB key, as shown in Figure 7. You can click and drag this icon to change the position of the key in the subdirectory.
Click the ![]() icon again to exit "re-order" mode.
icon again to exit "re-order" mode.

Copy and paste ODB values
You can copy and paste ODB information to/from your clipboard using the ![]() and
and ![]() icons.
icons.
For copying there are 4 options:
- Just click the
 icon. This will copy the entire directory (and any subdirectories) as JSON.
 - Click on a row (or rows) and they will be highlighted in blue. Then click the icon. This will copy the names/values of the selected keys as JSON.
- Right-click on a row and choose "Copy key". This will copy the name/value of the selected key as JSON.
- Right-click on a row and choose "Copy plain text". This will copy the name/value of the selected key as plain text.
The result of the first 3 can be used to paste the data elsewhere using the ![]() icon. If a key already exists with the given name, a new version is made with "copy" (or "copy 2" etc.) appended.
icon. If a key already exists with the given name, a new version is made with "copy" (or "copy 2" etc.) appended.
Rename ODB keys
You can change the name of an ODB key in two ways:
- Click on a row and it will be highlighted in blue. Then click the
 icon and you will be prompted for the new name.
 - Right-click on a row and select "Rename key..."