POL: Webpages: Difference between revisions
No edit summary |
No edit summary |
||
| (One intermediate revision by the same user not shown) | |||
| Line 10: | Line 10: | ||
=== POL Main Status Page === | === POL Main Status Page === | ||
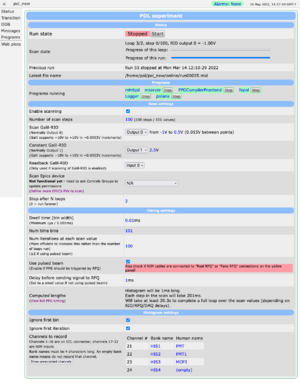
[[Image:POL_status_page.png|thumb|right|POL main status page]] | |||
Point a browser to ''https://midpol.triumf.ca'' to access the POL experiment's main status page. | |||
This is a custom page (not the standard midas status page) and includes both the state of the run and the key settings that a user might want to edit. | This is a custom page (not the standard midas status page) and includes both the state of the run and the key settings that a user might want to edit. | ||
| Line 59: | Line 59: | ||
==== Histogram settings section ==== | ==== Histogram settings section ==== | ||
The histogram settings section lets you state which MCS channels should be recorded, and which time bins should be ignored. | |||
* ''Ignore first bin'' should generally be enabled, as otherwise it would include any hits seen while waiting for the RFQ to trigger. | |||
* ''Ignore first iteration'' should generally be enabled, as otherwise it would include hits from before the RFQ was even triggered (the RFQ is triggered at the end of each histogram) | |||
* ''Channels to record'' maps MCS channel number to midas bank names and human-readable names. The bank names must be 4 letters long, and legacy analysis code expects them to be called <code>HIS1</code>, <code>HIS2</code> etc (more modern code doesn't care). The human name can be up to 32 characters long, and is just used to make analysis outputs more user friendly (e.g. on the web plots page). | |||
=== Web plots page === | === Web plots page === | ||
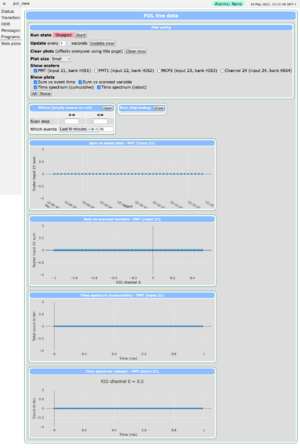
[[Image:POL_web_plots.png|thumb|right|POL web plots page]] | |||
The web plots page shows ToF histograms while a run is in progress. It can show plots of: | |||
* Total counts in the histogram as a function of time since the run started | |||
* Total counts in the histogram versus the DAC voltage | |||
* ToF histogram (separate plot for each DAC setting) | |||
* ToF histogram (total for the run) | |||
A couple of filters are available: | |||
* Which MCS channels to show. A separate set of plots is created for each channel. | |||
* Only show data from certain DAC settings. Specify the step number (not the voltage). Use the "Scan step lookup" box to find the step number for a given voltage. | |||
* Only show data from a given time period (e.g. last 10 minutes, last 3 scan loops, whole run) | |||
The plots are created by the polana python program, and will update automatically as the run progresses. | |||
=== Messages page === | === Messages page === | ||
| Line 67: | Line 87: | ||
More verbose output from the frontend code can be viewed in the [[POL#Viewing_the_state_of_the_DAQ_programs|frontend window]]. | More verbose output from the frontend code can be viewed in the [[POL#Viewing_the_state_of_the_DAQ_programs|frontend window]]. | ||
=== Transition page === | === Transition page === | ||
Latest revision as of 13:55, 17 February 2023
Links
Common pages
POL Main Status Page
Point a browser to https://midpol.triumf.ca to access the POL experiment's main status page.
This is a custom page (not the standard midas status page) and includes both the state of the run and the key settings that a user might want to edit.
Status section
The status section shows:
- buttons for starting/stopping the run
- the progress of the run (both progress bars and text)
- the latest file that was written to disk
The "Start" button takes you to an intermediate page where you can state whether data should be written to disk or not. This should always be enabled unless you're running tests.
The "Stop" button stops the run immediately. If you would prefer to wait for the current DAC scan to complete, you can click the "Stop after this run" button instead.
Programs section
The Programs section lets you start and stop the DAQ programs. ALL PROGRAMS SHOULD BE GREEN BEFORE STARTING A RUN! If any are red, click the small "Start" button next to the program name to restart it.
If programs are repeatedly crashing, check the troubleshooting tips or contact a DAQ expert.
Scan settings section
The scan settings section lets the user choose how the DAC is scanned. The most commonly-changed settings are:
- Number of scan steps
- The start / end voltages of the scan
- Stop after N loops
Note that you specify the number of steps/gaps; data will be taken at N+1 points. E.g. 100 steps between 0V and 4V gives a gap of 0.04V between points. But to include both 0V and 4V in the scan, we need to take data at 101 points.
If you set "Stop after N loops" to 0, the run will continue forever until stopped by the user.
If the wiring to the Galil-RIO is changed, you can change the input/output numbers that are controlled.
In principle, an EPICS PV can be scanned as well. However the pol user / lxpol machine does not currently have permission to edit the relevant PVs. The controls group must be asked to add this permission when relevant. You should then click the "Define more EPICS PVs to scan" link to be taken to a webpage where you can define the PV names to scan.
Timing settings section
The timing settings section defines the timing sequence that will be executed by the PPG. The program structure is stable for POL (unlike TITAN/BNMR), and the user just specifies a couple of key parameters.
- Dwell time is the width of each bin in the ToF histogram.
- Num time bins is the number of bins in the ToF histogram.
- Num iterations at each scan value is how many times to trigger the RFQ before changing the DAC. There is deadtime associated with flushing data from the MCS when changing the DAC value, so it's more efficient to increase this value rather than running for more loops.
- Use pulsed beam changes whether the PPG should restart itself when it finishes a cycle, or if it should wait for the RFQ.
- Delay before sending signal to RFQ is a delay after we've finished all the time bins, but before we send a signal to rearm the RFQ. You may want to increase this value to ensure any slow tail population isn't going to affect the data from the next RFQ injection. If you don't have a long slow tail, you can set this as low as you want (even down to 0ms).
- Computed lengths shows how long each cycle/step/loop will take. It also includes a link to a visualization of the timing signals the PPG will produce if you want to double-check the effect of your settings.
Histogram settings section
The histogram settings section lets you state which MCS channels should be recorded, and which time bins should be ignored.
- Ignore first bin should generally be enabled, as otherwise it would include any hits seen while waiting for the RFQ to trigger.
- Ignore first iteration should generally be enabled, as otherwise it would include hits from before the RFQ was even triggered (the RFQ is triggered at the end of each histogram)
- Channels to record maps MCS channel number to midas bank names and human-readable names. The bank names must be 4 letters long, and legacy analysis code expects them to be called
HIS1,HIS2etc (more modern code doesn't care). The human name can be up to 32 characters long, and is just used to make analysis outputs more user friendly (e.g. on the web plots page).
Web plots page
The web plots page shows ToF histograms while a run is in progress. It can show plots of:
- Total counts in the histogram as a function of time since the run started
- Total counts in the histogram versus the DAC voltage
- ToF histogram (separate plot for each DAC setting)
- ToF histogram (total for the run)
A couple of filters are available:
- Which MCS channels to show. A separate set of plots is created for each channel.
- Only show data from certain DAC settings. Specify the step number (not the voltage). Use the "Scan step lookup" box to find the step number for a given voltage.
- Only show data from a given time period (e.g. last 10 minutes, last 3 scan loops, whole run)
The plots are created by the polana python program, and will update automatically as the run progresses.
Messages page
MIDAS clients can write informational/error messages that appear on the Messages page. Error messages appear with a red background. This is a useful page to look at to help diagnose issues with the DAQ.
More verbose output from the frontend code can be viewed in the frontend window.
Transition page
The transition page is shown when you click to start or stop a run. It shows the progress of the clients handling the run state transition.
In particular, it will show you an error message if the run fails to start for some reason (e.g. because a parameter is set to an invalid value).
Less common pages
Programs page
The Programs page shows which clients are connected to midas. You can start/stop them, and see which computers they're running on. On POL it is mostly redundant with the Programs section of the main status page.
ODB page
The ODB page provides low-level access to all the settings in the POL experiment. POL is a relatively simple setup however, and most settings can be configured using the main status page.
PPG page
The PPG page is not linked from every page. You can access it from the main status page by clicking the "View full PPG timing" link in the timing settings section. It displays the program that will be executed, and a plot visualizing.
Users should NOT edit/rename the PPG program manually without careful consideration. In particular, the main status page (which simplifies editing the program) uses hard-coded ODB paths / block names for the settings users need to edit.
EPICS definitions page
The EPICS definitions page is not linked from every page. You can access it from the main status page by clicking the "Define more EPICS PVs to scan" link in the scan settings section. It displays an interface for setting details about EPICS devices that can be scanned during a run. See the help text at the top of that page for more details.
Note that the controls group will need to add permission for the pol user on lxpol to actually control these PVs.

