BNMR: Custom Status page: Difference between revisions

From DaqWiki
Jump to navigation Jump to search
m (Bsmith moved page DaqWiki:BNMR: Custom Status page to BNMR: Custom Status page without leaving a redirect)
No edit summary
Line 2: Line 2:
== Links ==
== Links ==
<div style="column-count:3;-moz-column-count:3;-webkit-column-count:3">
* [[BNMR]]
* [[BNMR: Custom pages|BNMR/BNQR Custom pages]]
* [[BNMR: Experimental Modes|Experimental Modes]]
* [[BNMR: Custom Status page|Custom Status page]]
* [[BNMR: Getting Started|Getting Started]]
* [[BNMR: Custom Settings page|Custom Settings page]]
* [[BNMR: Custom Parameters page|Custom Parameters page]]
* [[BNMR: Custom Logging page|Custom Logging page]]
* [[BNMR#Nomenclature|Nomenclature]]
* [[BNMR: Custom Modes page|Custom Modes page]]
* [[BNMR: Custom Expert page|Custom Expert page]]
</div>


</div>
== Introduction ==
== Introduction ==
When the webserver is used to connect to a MIDAS experiment, the standard [https://midas.triumf.ca/MidasWiki/index.php/Status_Page MIDAS Status page] is shown, unless
The standard [https://midas.triumf.ca/MidasWiki/index.php/Status_Page MIDAS Status page] is not very useful for {{bnmqr|join=and}}, so it has been replaced by a custom version for these experiments.
it has been replaced by a '''Custom Status page'''. This is the case for the  {{bnmqr|join=and}} experiments. A  [[BNMR: Custom pages|custom page]] written specifically for the  {{bnmqr|join=and}} experiments replaces the standard MIDAS Status page. It is called the '''Custom Status page'''.


Note that the MIDAS client [https://midas.triumf.ca/MidasWiki/index.php/Mhttpd mhttpd] must be running for the webserver to be available. To connect to the Custom Status page, see  [[BNMR: Getting Started|Getting Started]].


== Custom Status Page ==
The custom status page allows the user to
The custom status page allows users to enter experimental parameters easily, including changing  [[BNMR: Experimental Modes|Experimental Modes]] and [[BNMR: Run numbering|run type]]. A [[BNMR: Custom Parameters page|Custom Parameter page]] accessed from the custom status page allows users to enter run parameters easily.  The custom status page for {{bnmr}} and {{bnqr}} experiments is shown in Figures 1 and 2 respectively.
* view the current state of the run, including scan status, histogram counts, EPICS values and CAMP values
 
* change which experimental mode is being used
== Example 1: BNMR Custom Status Page ==
* change whether a run is "real" or "test" data
;Figure 1 BNMR Custom Status Page (Run Stopped)
* change/view the helicity and beam settings
[[Image:Bnmr_status_stopped.png|975px]]
* enable/disable the alarm system
<br clear=all>
* force neutral beam checks to be re-referenced
== Example 2: BNQR Custom Status Page ==
;Figure 2 BNQR Custom Status Page (Run Stopped)
[[Image:Bnqr_status_stopped.png|975px]]
<br clear=all>
== Example 3: BNQR Custom Status Page (Running) ==
[[Image:Bnqr_status_running.png]]
<br clear=all>
 
== Features of the Custom Status Page ==
The Custom Status Page provides status information specific to the {{bnmqr|join=or}} experiments. The option of reverting to the MIDAS standard status page is provided via the ToggleStatusPage button.
 
=== Command and Page Buttons ===
;Figure 3 Command and Page Buttons and Page Update Information
[[Image:Bnmr_top_buttons.png]]
<br clear=all>
In the middle of the top line on the Custom Status page (Figure 1) are found the standard [https://midas.triumf.ca/MidasWiki/index.php/Status_Page#Menu_Buttons Menu buttons] to stop and start runs or to display
different MIDAS pages (Figure 3). These standard buttons appear on most MIDAS pages (see [https://midas.triumf.ca/MidasWiki/index.php/Status_Page MIDAS Status page] for more information).
 
Below these buttons are buttons specific to the {{bnmqr|join=and}} experiment. Some are [[BNMR: Perlscripts#Customscripts|customscript buttons]], that is, a script is run when the button is pressed. Others switch to a different custom page. More buttons appear when a run is in progress (Figure 4).
 
;Figure 4 BNQR Page Buttons for Type 1 Run in progress
[[Image:Bnqr_buttons_running.png]]
<br clear=all>
 
The actions of these buttons are described in Table 1.
 
{|  style="text-align: left; width: 100%; background-color: rgb(255, 255, 255);" border="3" cellpadding="2" cellspacing="2"
|+ Table 1: Custom Buttons
|-
! Button !! Action
|-
| {{Button|name=Autorun}}
| toggles [[BNMR: Autoruns|Autoruns]] on or off
|-
| <span style="color: brown; background-color: #CCCCCC; font-style:italic; font-size: 90; padding:0.25em;
padding-left: 0.5em;padding-right: 0.5em;border:1px solid #808080;border-radius: 5px;margin-bottom:1px;">rf_config</span>
| runs client <span style="color:green;  font-style:italic; ">rf_config</span> to test the validity of the input parameters without actually starting a run<br>
|-
| <span style="color: brown; background-color: #CCCCCC; font-style:italic; font-size: 90; padding:0.25em;
padding-left: 0.5em;padding-right: 0.5em;border:1px solid #808080;border-radius: 5px;margin-bottom:1px;">ToggleStatusPage</span>
| runs a perlscript causing the status page to revert to the standard Midas Status Page. After pressing this button, a popup window with a message "Now refresh page" will appear. After refreshing the page, the MIDAS status page will appear.  From this page, the CustomStatus page can be reached by clicking on the custom button  <span style="color: #444444; background-color: #CCCCCC; font-style:italic; font-size: 90; padding:0.25em;
padding-left: 0.5em;padding-right: 0.5em;border:1px solid #808080;border-radius: 5px;margin-bottom:1px;">CustomStatus</span> button. This will show the Custom status page as a regular Custom page. A message can be seen at the top of the custom page in this case "Using alias link "CustomStatus&" from Midas Main Status Page".  To revert to running this page as the Custom Status Page, press the button once more and refresh the page.
|- 
| <span style="color: blue; background-color: #CCCCCC; font-style:italic; font-size: 90; padding:0.25em;
padding-left: 0.5em;padding-right: 0.5em;border:1px solid #808080;border-radius: 5px;margin-bottom:1px;">RunParams</span>
|gives access to the Custom Parameter page.
|-
|
<span style="color: green; background-color: #CCCCCC; font-style:italic; font-size: 90; padding:0.25em;
padding-left: 0.5em;padding-right: 0.5em;border:1px solid #808080;border-radius: 5px;margin-bottom:1px;">ShowWindows</span>
|button displays the help information on displaying the frontend and other client consoles.
|-
|
<span style="color: brown; background-color: #CCCCCC; font-style:italic; font-size: 90; padding:0.25em;
padding-left: 0.5em;padding-right: 0.5em;border:1px solid #808080;border-radius: 5px;margin-bottom:1px;">RerefThresholds</span>
|This button is present when a run is in progress and thresholds are enabled. Pressing this button calls the perlscript [[BNMR: Perlscripts#reref.pl|reref.pl]] which causes a rereference of the thresholds.
|-
|
<span style="color: red; background-color: #CCCCCC; font-style:italic; font-size: 90; padding:0.25em;
padding-left: 0.5em;padding-right: 0.5em;border:1px solid #808080;border-radius: 5px;margin-bottom:1px;">ResetCampLog</span>
|This button is present when a Type 1 run is in progress. Pressing this button causes the CAMP logging to be reset (see perlscript [[BNMR: Perlscripts#at_start_run.pl|at_start_run.pl]].
|-
|
<span style="color: red; background-color: #CCCCCC; font-style:italic; font-size: 90; padding:0.25em;
padding-left: 0.5em;padding-right: 0.5em;border:1px solid #808080;border-radius: 5px;margin-bottom:1px;">ResetEpicsLog</span>
|This button is present when a Type 1 run is in progress. Pressing this button causes the EPICS logging to be reset (see perlscript [[BNMR: Perlscripts#at_start_run.pl|at_start_run.pl]].


|}


=== Page Update Information ===
The page update information is also visible in Figure 3. The custom status page updates completely with a '''full page reload''' every minute. In between, it updates the information using innerHTML. This is called a '''partial reload'''. The time between partial reloads can be set by the user by clicking on the Page update link at the left (Figure 3). The minimum time is 5s. 


The relevant ODB data are read asynchronously using the [https://midas.triumf.ca/MidasWiki/index.php/Mjsonrpc#Javascript_client_library  MIDAS mjson rpc client library] each time a full or partial reload is done. The times of the last full and partial reloads and ODB data last read are also shown in Figure 3.
== Implementation ==


==== Countdown ====
We force Midas to use our custom status page by deleting the file <code>$MIDASSYS/resources/status.html</code> with a symlink to <code>bnxr_common/custom/status.html</code> from the bnmr repository.
A '''countdown''' to the next full reload is also visible. If the page is set to update every 10 sec, the Countdown will count down from 6 to 1, when a full page reload will occur.


==== Progress ====
The page uses [https://daq00.triumf.ca/MidasWiki/index.php/Mjsonrpc Midas JRPC] calls to talk to:
The '''Progress''' display is a numerical progress flag. This indicates the progress of reading the data from the ODB, and can be used for debugging. It works on a timer, updating every half a second. The Progress Code numbers/colours are explained in Table 2. The functions whose names begin with "''mjsonrpc''" refer to [https://midas.triumf.ca/MidasWiki/index.php/Mjsonrpc#Javascript_client_library MIDAS mjson rpc] functions. All other functions are found in the Javascript source code {{Filepath|path=/home/bn[mq]r/online/custom/cs_functions.js}}. If the progress code is shown in black, the callback has been received or the function is finished. Between updates, the same black code number would fill the progress line. Instead, the colour is alternated between black and grey.
* the <code>mode_changer.py</code> program for changing modes and changing between real/test runs
* the <code>rf_calculator_fe.py</code> program for visualizing the PPG and PSM settings as plots


; Table 2 Progress Code
The page uses standard [https://daq00.triumf.ca/MidasWiki/index.php/Custom_Page Midas custom page] tools for editing ODB settings. An ODB hotlink is used for the neutral beam re-referencing.
{| border="0"  cellpadding="2" cellspacing="2" style="border-collapse:collapse; color:black; background-color:aliceblue" 
|-
!Progress <br> Code
! Colour
! style="color:aliceblue"| spacer
!Explanation
|-
|  0 || 0 || style="color:aliceblue"| spacer || Initialize routine
|-
|rowspan=2 | 1 ||  style="color:red"  | 1  || style="color:aliceblue"| spacer || Waiting for a callback from ''mjsonrpc_db_get_values'' (called by functions ''read_data'' or ''enable_autorun'' or ''async_odbset'')
|-
|  style="color:black"  | 1 || style="color:aliceblue"| spacer || Got the callback from ''mjsonrpc_db_get_values''
|-
|rowspan=2 | 2 ||  style="color:blue" | 2  || style="color:aliceblue"| spacer || In function ''assign_data''
|-
|  style="color:black" | 2 || style="color:aliceblue"| spacer || Function ''assign_data'' done
|-
| rowspan=2 | 3 || style="color:slateblue" | 3  || style="color:aliceblue"| spacer || In the callback from ''write_last_message''
|-
| style="color:black" | 3 || style="color:aliceblue"| spacer || Function ''write_last_message'' done
|-
|rowspan=2 | 4 || style="color:brown" | 4  || style="color:aliceblue"| spacer || In function ''load_partial''
|-
| style="color:black" | 4 || style="color:aliceblue"| spacer || Function ''load_partial'' done
|-
|rowspan=2 | 5 || style="color:purple" |  5  || style="color:aliceblue"| spacer || In function ''load_all''
|-
| style="color:black" | 5 || style="color:aliceblue"| spacer || Function ''load_all'' done
|-
| rowspan=2 | 6 || style="color:green" | 6  || style="color:aliceblue"| spacer || In function ''update''
|-
| style="color:black" | 6 || style="color:aliceblue"| spacer || Function update done
|-
| rowspan=2 | 7 || style="color:fuchsia" | 7  || style="color:aliceblue"| spacer || Waiting for callback from ''mjsonrpc_db_paste'' (write to ODB)
|-
| style="color:black" | 7 || style="color:aliceblue"| spacer || Got callback from ''mjsonrpc_db_paste'' (write to ODB)
|-  
|}


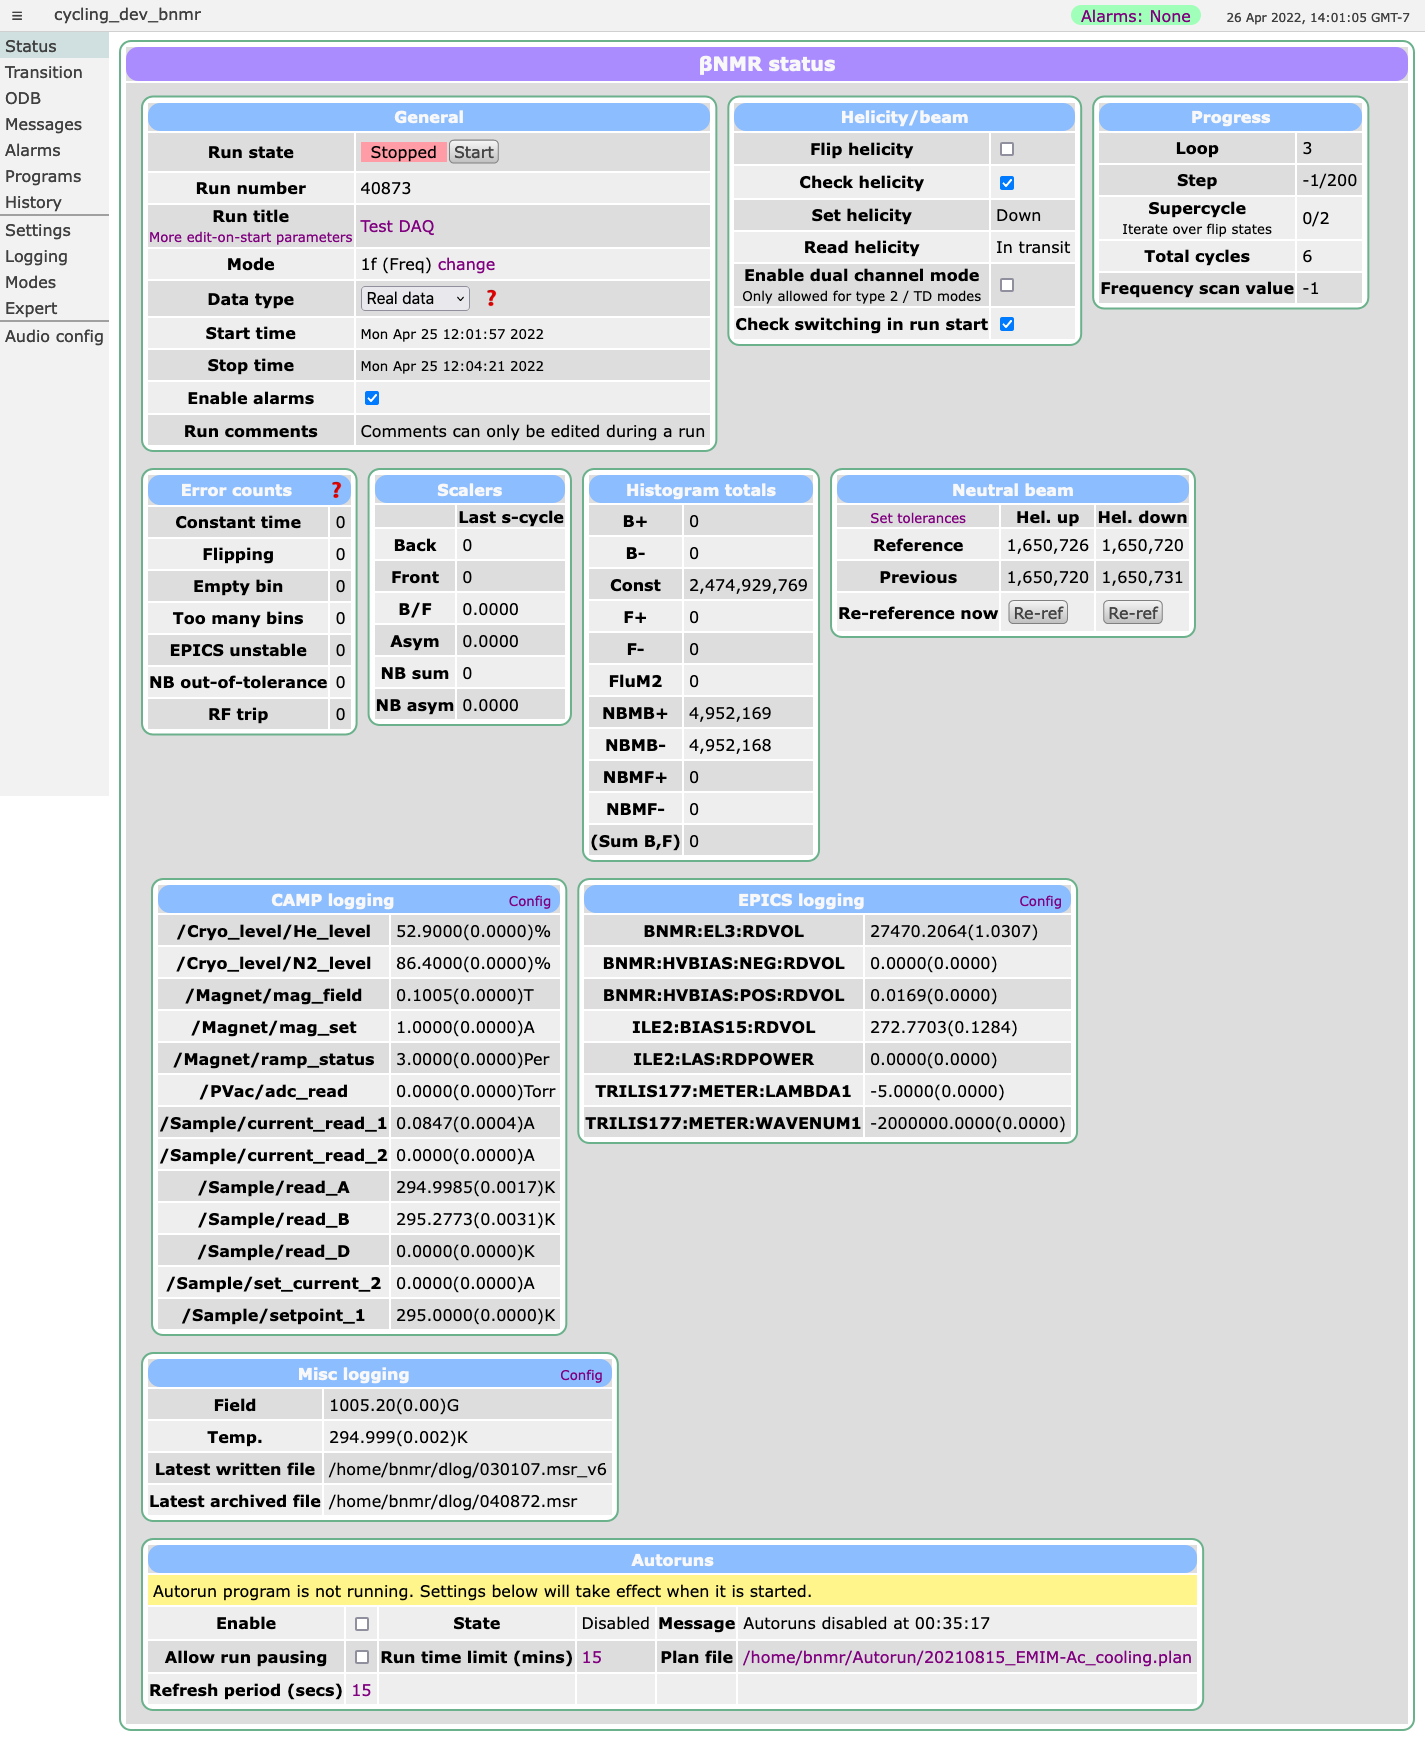
== Example screenshot ==


=== Status Line ===
[[Image:Custom_status.png|left|frame|Figure 1:Parameter page for Mode 1f with run stopped]]
The Status lines on the Custom Status Page show the status of the run and some of the important settings (Figure 4).
<br>
; Figure 4 Status lines from the BNQR Custom Status Page
[[Image:Bnqr_status_lines.png]]
<br clear=all>
<br clear=all>
The first line shows the selected  [[BNMR: Experimental Modes|Experimental (PPG) Mode]]. This changes when the mode is changed by pressing one of the
[#Select PPG and Run Mode|PPG Mode buttons]. The run number (Table 3) is shown in different colours for a '''test''' or '''real''' run (see [[BNMR: Run numbering]]). The [#Select PPG and Run Mode|Run Mode buttons] are used to switch between test and real runs.
{| border="0"  cellpadding="2" cellspacing="2" style="border-collapse:collapse; color:black; background-color:white" 
|-
!Table 3: Run number
!style="color:white"| spacer
!Table 4: Run State
!style="color:white"| spacer
!Table 5: In Transition
|-
|
{| border="1"  cellpadding="2" cellspacing="2" style="border-collapse:collapse; color:black; background-color:aliceblue" 
|rowspan="2" style="font-weight:bold"|Run number
|style="background-color:lime"| 45059
|style="font-weight:bold"| real
|-
|style="background-color:yellow"| 30102
|style="font-weight:bold"| test
|-
| '''ODB Key'''
| colspan=2  style="color:purple;font-style:italic"| [https://midas.triumf.ca/MidasWiki/index.php//Runinfo_ODB_tree#Run_number Run number]
|}
|style="color:white"| spacer
|
{| border="1"  cellpadding="2" cellspacing="2" style="border-collapse:collapse; color:black; background-color:aliceblue" 
|-
| rowspan="3"|Run Status
|style="background-color:red"| Stopped
|-
|style="background-color:yellow"| On Hold
|-
|style="background-color:lime"| Running
|-
| '''ODB Key'''
| colspan=2  style="color:purple;font-style:italic"| [https://midas.triumf.ca/MidasWiki/index.php//Runinfo_ODB_tree#State State]
|}
|style="color:white"| spacer
|
{| border="1"  cellpadding="2" cellspacing="2" style="border-collapse:collapse; color:black; background-color:aliceblue" 
|-
! ODB Key !! Value TRUE !! Value FALSE
|-
|  style="color:purple;font-style:italic"| [https://midas.triumf.ca/MidasWiki/index.php//Runinfo_ODB_tree#Transition_in_progress Transition in progress]
| style="background-color:orange;"| In Transition
| style="background-color:white;"|
|-
|}
|}
The run state is shown in different colours depending on the run state (Table 4).
An orange box (Table 5) is present on the Status Line when the run is in transition. This normally occurs when the run is being started or stopped. If the run is stuck in transition, an alarm message may appear.
The time the run started is shown and, if running, the run duration, otherwise the time the run stopped.
The next line shows the Status, which may show an information message.  Below this is a line showing the directory of the saved files.
Next are a number of boxes showing important settings (Table 6). Most are provided with a checkbox so the user can change the values from the custom status page.
; Table 6 Status values
{| border="1" style="border-collapse:collapse; color:black; background-color:aliceblue" 
|+ Status boxes
! ODB Key !! Value TRUE !! Value FALSE !! Checkbox
|-
| [[BNMR: Keys in /Equipment/FIFO acq/Frontend/Hardware ODB Subtree#Enable dual channel mode|Enable dual channel mode]]
|style="background-color:yellow"| Single channel mode
|style="background-color:orange"| Dual channel mode || yes
|-
| style="color:purple;font-style:italic"|[https://midas.triumf.ca/MidasWiki/index.php//Alarms_ODB_tree#Alarm_system_active Alarm system active]
|style="background-color:lime"| Alarms Active
|style="background-color:red"| Alarms Active || yes
|-
| [[BNMR: Keys in /Equipment/FIFO acq/Frontend/Hardware ODB Subtree#Enable all hel checks|Enable all hel checks]]
|style="background-color:lime"|Helicity Check
|style="background-color:red"| Helicty Check  || yes
|-
| [[BNMR: Keys in /Equipment/FIFO acq/Frontend/Hardware ODB Subtree#Enable helicity flipping|Enable helicity flipping]]
|style="background-color:lime"|Helicity Flip
|style="background-color:red"| Helicity Flip|| no
|-
| [[BNMR: Keys in /Equipment/FIFO acq/Frontend/Hardware ODB Subtree#Enable epics switch checks|Enable epics switch checks]]
|style="background-color:lime"|Single/Dual Mode<br>Switch Check
|style="background-color:red"| Single/Dual Mode<br>Switch Check || yes
|-
|}
;NOTE
:When '''real''' data is being taken (i.e. the run mode is set to '''real''' ), this line should
look similar to Figure 4, i.e. all checks are enabled.
=== Logging/Threshold/Helicity  ===
;Figure V Line showing Logging Thresholds and Helicity
[[Image:Bnqr_logging_line_running.png]]
<br clear=all>
=== Last Midas Message ===
The last message from the MIDAS message system is displayed on this line. More messages can be seen on the [https://midas.triumf.ca/MidasWiki/index.php/Message_Page Message Page].
===Frontend Scalers===
;Figure S BNQR Frontend scalers for a Type 1f run
[[Image:Bnqr_fescalers_running.png]]
<br clear=all>
;Figure T BNMR Frontend scalers for a Type 2 run
[[Image:Bnmr_fescalers_type2.png]]
<br clear=all>
=== Histogram Stats ===
;Figure R Histogram statistics for Type 1 run on BNQR
[[Image:Bnqr_histostats_running.png]]
<br clear=all>
;Figure Q Histogram statistics for Type 2 run on BNMR
[[Image:Bnmr_histostats_type2.png]]
<br clear=all>
=== Selection of PPG Mode and Run Mode  ===
The line on the Custom Status Page containing the PPG Mode and Run Mode buttons is shown in Figure 5.
These buttons are visible only when the run is stopped.
;Figure C PPG Mode and Run Mode switch buttons
[[Image:Bnqr_select_mode_line.png]]
<br clear=all>
. The user selects the desired PPG Mode by pressing one of the PPG Mode buttons. The PPG Mode buttons are [[BNMR: Perlscripts#Customscripts|customscript buttons]] which call the perlscript [[BNMR: Perlscripts#change_mode.pl|change_mode.pl]]. The perlscript may take a few seconds to run, so the buttons are hidden, and a message (Figure D) is displayed to prevent the impatient user from clicking more buttons. After a short time, the PPG Mode will change to the selected mode and the PPG Mode buttons will reappear.
; Figure D PPG Mode changing
[[Image:Bnmr_ppg_mode_changing.png]]
<br clear=all>
This line also contains the '''Run Mode''' buttons  <span style="font-size:80%">{{Button|name=TEST}}</span> and  <span style="font-size:80%">{{Button|name=REAL}}</span>. The buttons are only visible when the run is stopped.
The coloured (non-grey) button indicates whether the run mode is currently set to TEST or REAL.
The Run Mode buttons are [[BNMR: Perlscripts#Customscripts|customscript buttons]] which call the perlscripts [[BNMR: Perlscripts#real_run.pl|real_run.pl]] or [[BNMR: Perlscripts#test_run.pl|test_run.pl]] The perlscript may take a few seconds to run, so a message is displayed to prevent the impatient user from clicking more buttons.
For example, if the run type is REAL as in Figure C, and the TEST button is pressed, a message will appear (Figure E), then the run type will change to TEST (Figure F).
{| border="0" style="border-collapse:collapse; color:black; background-color:aliceblue" 
|+
! Figure E Run Mode is changing
! style="color:white;background-color:white"|spacer
! Figure F  Run Mode has changed
|-
| [[Image:Bnmr_run_mode_changing1.png]]<br clear=all>
| style="color:white;background-color:white"|spacer
| [[Image:Bnmr_run_mode_changing.png]]<br clear=all>
|}
'''When a run is in progress''', the PPG Mode and Run Mode buttons are replaced by  <span style="font-size:80%">
* Type 2 Runs
** {{Button|name=TOGGLE}}</span> see Figure MISSING.
* Type 1 runs
**  Toggle is not supported (Figure N).
; Figure N PPG and Run Mode selection line when Type 1 Run in Progress
[[Image:Bnqr_run_mode_running.png]]
<br clear=all>
* Autorunning
** this line is hidden
== Review Run Params ==
;Figure U Review Run Parameters
[[Image:Bnqr_review_run_params.png]]
<br clear=all>
== Alarm Banner ==
;Figure X Alarm banner showing helicity mismatch for BNMR
[[Image:Bnmr_mismatch_hel.png]]
<br clear=all>
== Autoruns ==
; Figure P Control buttons with autorun selected
[[Image:Bnmr_autorun_button.png]]
<br clear=all>
; Figure O Autorun acquiring data
[[Image:Bnmr_autorun_acq.png]]
<br clear=all>
== Programming Information ==
See [[BNMR: Custom pages|Custom Pages]].


[[Category:BNMR]] [[Category:Webserver]]
[[Category:BNMR]] [[Category:Webserver]]

Revision as of 14:11, 26 April 2022

Links

Introduction

The standard MIDAS Status page is not very useful for bnmr and bnqr, so it has been replaced by a custom version for these experiments.

Note that the MIDAS client mhttpd must be running for the webserver to be available. To connect to the Custom Status page, see Getting Started.

The custom status page allows the user to

  • view the current state of the run, including scan status, histogram counts, EPICS values and CAMP values
  • change which experimental mode is being used
  • change whether a run is "real" or "test" data
  • change/view the helicity and beam settings
  • enable/disable the alarm system
  • force neutral beam checks to be re-referenced

Implementation

We force Midas to use our custom status page by deleting the file $MIDASSYS/resources/status.html with a symlink to bnxr_common/custom/status.html from the bnmr repository.

The page uses Midas JRPC calls to talk to:

  • the mode_changer.py program for changing modes and changing between real/test runs
  • the rf_calculator_fe.py program for visualizing the PPG and PSM settings as plots

The page uses standard Midas custom page tools for editing ODB settings. An ODB hotlink is used for the neutral beam re-referencing.

Example screenshot

Figure 1:Parameter page for Mode 1f with run stopped