ODB Page: Difference between revisions
No edit summary |
No edit summary |
||
| (13 intermediate revisions by the same user not shown) | |||
| Line 1: | Line 1: | ||
{{Pagelinks}} | |||
= Links = | = Links = | ||
{{mhttpdpages}} | |||
= Purpose = | = Purpose = | ||
The purpose of the [[mhttpd]] ODB page is to allow the user to browse, search and edit the ODB of an experiment. | The purpose of the [[mhttpd]] ODB page is to allow the user to browse, search and edit the ODB of an experiment. | ||
This gives a graphical alternative to | This gives a user-friendly graphical alternative to the ODB editor [[odbedit]]. | ||
= Access the ODB page = | = Access the ODB page = | ||
''' Click image to enlarge''' | |||
[[File:odb_page.png|thumb|left|Figure 1: ODB Page example]] | [[File:odb_page.png|thumb|left|Figure 1: ODB Page example]] | ||
The ODB Page is accessed from the [[Status Page]] (or | |||
The ODB Page is accessed from the [[Status Page]] (or one of the other Pages) by clicking on the | |||
menu-button{{Button|name=ODB}}. | |||
The top level ODB trees will be visible as key-links (i.e.links to a key) ([[#Example ODB Page|Figure 1]]). | The top level ODB trees will be visible as key-links (i.e.links to a key) ([[#Example ODB Page|Figure 1]]). | ||
The ODB Page is largely self-explanatory. However, a brief description of its functionality and [[#Limitations|limitations]] is given below. | |||
;Note | |||
:If "ODB" button is not present on the Status Page, it may have been [[Status Page#page-switch-buttons|hidden]]. | |||
<div style="clear: both"></div> | <div style="clear: both"></div> | ||
= Browse the ODB = | = Browse the ODB = | ||
<div id="Figure 2"></div> | <div id="Figure 2"></div> | ||
[[File:odb_page_list.png|thumb|left|Figure | {| style="text-align: left; width: 100%; background-color: rgb(255, 255, 255);" border="0" cellpadding="2" cellspacing="2" | ||
By clicking on the key-links on the ODB page ([[#Example ODB Page|Figure 1]]), the user can browse the various subtrees. By clicking on the "+" link adjacent to the "Value" heading ([[#Figure 2|Figure | |+ '''Click on a thumbnail to enlarge''' | ||
|- | |||
| [[File:odb_page_list.png|thumb|left|Figure 2a: ODB Page Listing]] | |||
| [[File:odb_page_list2.png|thumb|left|Figure 2b: Expanded ODB Page Listing]] | |||
|} | |||
<br clear=all> | |||
By clicking on the key-links on the ODB page ([[#Example ODB Page|Figure 1]]), the user can browse the various subtrees ([[#Figure 2|Figure 2a]]). By clicking on the "+" link adjacent to the "Value" heading ([[#Figure 2|Figure 2b]]) , the type and size of the keys are shown. This is equivalent to the [[odbedit]] commands <span style="color:saddlebrown; ">ls</span> and <span style="color:saddlebrown;">ls -l</span>. | |||
= Change the value of an ODB key = | |||
By clicking on a Key Value link ([[#Figure 2|Figure 2]]), the user can change the value (unless password-protected or the key is write-protected - see [[Security]]). If web access is restricted, the user will be asked for a password the first time he/she attempts to edit a value. | |||
= Create | = Create an ODB key = | ||
<div id="Figure 3"></div> | <div id="Figure 3"></div> | ||
The user can create a new key in a tree or subtree by clicking the | The user can create a new ODB key in a tree or subtree using the [[ODB Page]] by | ||
<span style="color: #444444; background-color: #CCCCCC; font-style:italic; font-size: 90; padding:0.25em; | # entering the appropriate directory (see [[#Browse the ODB]]) | ||
# clicking the <span style="color: #444444; background-color: #CCCCCC; font-style:italic; font-size: 90; padding:0.25em; | |||
{| style="text-align: | padding-left: 0.5em;padding-right: 0.5em;border:1px solid #808080;border-radius: 5px;margin-bottom:1px;">Create</span> button ([[#Figure 2|Figure 2]]). | ||
This will result in a "Create ODB Entry box" pop-up (Figure 3). | |||
'''Figure 3: Create an ODB Key (click a thumbnail to enlarge)''' | |||
<gallery> | |||
File:odb_page_create.png|Figure 3a:<br> Create Type Integer | |||
File:odb_array_create1.png|Figure 3b:<br> Create Array Type String | |||
File:odb_array_create2.png|Figure 3c:<br> Created Keys | |||
</gallery> | |||
The '''Type''' of key to be created is selected from the ''Type'' drop-down list (Figure 3a). The choices are shown in Table 1. | |||
<div id="Table 1"></div> | |||
{| style="text-align: centre; width: 50%; background-color: rgb(grey); font-size:75%" border="1" cellpadding="1" cellspacing="1" | |||
|+ '''Table 1: ODB Key Types''' | |||
|- | |- | ||
| colspan="2" rowspan="1" style="vertical-align: top; background-color: lightgrey; font-weight: bold;" | Key Types | | colspan="2" rowspan="1" style="vertical-align: top; background-color: lightgrey; font-weight: bold;" | Key Types | ||
| Line 59: | Line 75: | ||
| Multi-line String | | Multi-line String | ||
|- | |- | ||
| Subdirectory | | <span style="color:green;font-weight:bold">Subdirectory</span> | ||
| Byte | | Byte | ||
|- | |- | ||
| Line 72: | Line 88: | ||
|- | |- | ||
| Double float(8 Bytes) | | Double float(8 Bytes) | ||
| Symbolic link | | <span style="color:fuchsia; font-weight:bold">Symbolic link</span> | ||
|} | |} | ||
<br clear=all> | <br clear=all> | ||
= | |||
== 1. Create a single value or array == | |||
[[#Figure 3|Figure 3a]] shows the creation of a key of type '''Integer''' (32-bit). The type "Integer (32-bit)" | |||
has been selected from the ''Type'' drop-down list ([[#Table 1|Table 1]] above). | |||
The name of the key "Number of cycles" has been filled in using the ''Name'' box. This key is not an array so the ''Array Size'' box has the default (1). The ''String size'' box will be ignored since this is a Integer key. The key is created by pressing the {{Button|name=Create}} button on Figure 3a. The value of the key will be set to 0 when created. This has been changed to 10 in Figure 3c by clicking on the Key Value link . | |||
[[#Figure 3|Figure 3b]] shows the creation of a '''String Array'''. The type "String" | |||
has been selected from the ''Type'' drop-down list ([[#Table 1|Table 1]] above). | |||
The ''Array size'' and ''String size'' boxes are set with the desired parameters. After pressing the {{Button|name=Create}} button on Figure 3b, the resulting array is shown in Figure 3c. The values of the array elements are set to "Empty" when created. The array values can be set by clicking on the Key Value links. | |||
== 2. Create a subdirectory or symbolic link == | |||
Create a '''subdirectory''' key in the same way as a regular key [[#Figure 3|Figure 3a]] by selecting <span style="color:green">subdirectory</span> from the ''Type'' drop-down list ([[#Table 1|Table 1]] above). [[#Figure 4|Figure 4a]] shows the creation of | |||
a subdirectory {{Odbpath|path=Edit on start}} in the {{Odbpath|path=/Experiment}} directory. | |||
The subdirectory is created by pressing the {{Button|name=Create}} button on Figure 4a. | |||
<div id="symbolic link"></div> | |||
A '''symbolic link''' (or '''link''') is a key which is a short-cut to another key in the ODB. | |||
Create a link by selecting <span style="color:fuchsia">symbolic link</span> from the ''Type'' drop-down list ([[#Table 1|Table 1]] above). | |||
Figure 4b shows the creation of | |||
an [[Edit-on-start Parameters|edit-on-start parameter]] which is a symbolic link called "write data" . | |||
The symbolic link is created by pressing the {{Button|name=Create}} button on Figure 4b. | |||
The value of this symbolic link is set to the ODB key {{Odbpath|path=/logger/write data}} in Figure 4c. The resulting link is shown in Figure 4d. | |||
<div id="Figure 4"></div> | <div id="Figure 4"></div> | ||
[[File:odb_page_delete.png|thumb|left|Figure | '''Figure 4 Creating subdirectory or symbolic link (click to enlarge thumbnails)''' | ||
The user can delete a key in a tree or subtree by clicking the | <gallery> | ||
File:odb_create_subdir.png|Figure 4a:<br> Create <span style="color:green">subdirectory</span> | |||
File: odb_link1.png | Figure 4b: <br> Create <span style="color:fuchsia">symbolic link</span> | |||
File: odb_link2.png | Figure 4c: Click on "(empty)" and fill in {{Odbpath|path=/logger/write data}} | |||
File: odb_link3.png | Figure 4d: Symbolic link has been created | |||
</gallery> | |||
<br clear=all> | |||
= Delete an ODB key = | |||
<div id="Figure 5"></div> | |||
[[File:odb_page_delete.png|thumb|left|Figure 5: ODB page Delete a key]] | |||
The user can delete a key in a tree or subtree by clicking the {{Button|name=Delete}} | |||
button. The user selects which to delete from a list of the keys in the subtree (e.g. Figure 5). | |||
<br clear=all> | <br clear=all> | ||
= Search the ODB for a key = | = Search the ODB for a key = | ||
[[File:odb_page_find.png|thumb|left|Figure | [[File:odb_page_find.png|thumb|left|Figure 6: ODB Page Find pop-up]] | ||
Click on the | Click on the {{Button|name=Find}} | ||
button. A pop-up (Figure 6) appears in which the user types the relevant information. | |||
button. A pop-up (Figure | |||
| Line 97: | Line 147: | ||
= Create Elog entry = | = Create Elog entry = | ||
[[File:odb_page_elog.png|thumb|left|Figure | [[File:odb_page_elog.png|thumb|left|Figure 7: ODB Page Elog pop-up]] | ||
An elog entry can be created easily from the ODB page by clicking the | An elog entry can be created easily from the ODB page by clicking the | ||
{{Button|name=Create Elog from this page}} | |||
button. A pop-up will appear for the user to fill in (Figure 7). | |||
<br clear=all> | <br clear=all> | ||
| Line 106: | Line 157: | ||
The ODB Page editor supports a subset of the functionality of [[odbedit]]. For example, the ODB Page editor does not support re-ordering or renaming ODB keys. For full editing capabilities [[odbedit]] must be used. | The ODB Page editor supports a subset of the functionality of [[odbedit]]. For example, the ODB Page editor does not support re-ordering or renaming ODB keys. For full editing capabilities [[odbedit]] must be used. | ||
[[Category:mhttpd]] | [[Category:mhttpd Pages]] | ||
[[Category:ODB]] | [[Category:ODB]] | ||
Revision as of 00:00, 12 August 2015
Links
Purpose
The purpose of the mhttpd ODB page is to allow the user to browse, search and edit the ODB of an experiment. This gives a user-friendly graphical alternative to the ODB editor odbedit.
Access the ODB page
Click image to enlarge

The ODB Page is accessed from the Status Page (or one of the other Pages) by clicking on the menu-button ODB.
The top level ODB trees will be visible as key-links (i.e.links to a key) (Figure 1). The ODB Page is largely self-explanatory. However, a brief description of its functionality and limitations is given below.
- Note
- If "ODB" button is not present on the Status Page, it may have been hidden.
Browse the ODB


By clicking on the key-links on the ODB page (Figure 1), the user can browse the various subtrees (Figure 2a). By clicking on the "+" link adjacent to the "Value" heading (Figure 2b) , the type and size of the keys are shown. This is equivalent to the odbedit commands ls and ls -l.
Change the value of an ODB key
By clicking on a Key Value link (Figure 2), the user can change the value (unless password-protected or the key is write-protected - see Security). If web access is restricted, the user will be asked for a password the first time he/she attempts to edit a value.
Create an ODB key
The user can create a new ODB key in a tree or subtree using the ODB Page by
- entering the appropriate directory (see #Browse the ODB)
- clicking the Create button (Figure 2).
This will result in a "Create ODB Entry box" pop-up (Figure 3).
Figure 3: Create an ODB Key (click a thumbnail to enlarge)
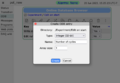
Figure 3a:
Create Type Integer
Figure 3b:
Create Array Type String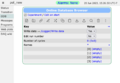
Figure 3c:
Created Keys


The Type of key to be created is selected from the Type drop-down list (Figure 3a). The choices are shown in Table 1.
| Key Types | |
| Integer(32-bit) | Float (4 bytes) |
| String | Multi-line String |
| Subdirectory | Byte |
| Signed byte | Character (8-bit) |
| Word (16-bit) | Short integer(16-bit) |
| Double Word (32-bit) | Boolean |
| Double float(8 Bytes) | Symbolic link |
1. Create a single value or array
Figure 3a shows the creation of a key of type Integer (32-bit). The type "Integer (32-bit)" has been selected from the Type drop-down list (Table 1 above). The name of the key "Number of cycles" has been filled in using the Name box. This key is not an array so the Array Size box has the default (1). The String size box will be ignored since this is a Integer key. The key is created by pressing the Create button on Figure 3a. The value of the key will be set to 0 when created. This has been changed to 10 in Figure 3c by clicking on the Key Value link .
Figure 3b shows the creation of a String Array. The type "String" has been selected from the Type drop-down list (Table 1 above). The Array size and String size boxes are set with the desired parameters. After pressing the Create button on Figure 3b, the resulting array is shown in Figure 3c. The values of the array elements are set to "Empty" when created. The array values can be set by clicking on the Key Value links.
2. Create a subdirectory or symbolic link
Create a subdirectory key in the same way as a regular key Figure 3a by selecting subdirectory from the Type drop-down list (Table 1 above). Figure 4a shows the creation of a subdirectory Edit on start in the /Experiment directory. The subdirectory is created by pressing the Create button on Figure 4a.
A symbolic link (or link) is a key which is a short-cut to another key in the ODB. Create a link by selecting symbolic link from the Type drop-down list (Table 1 above). Figure 4b shows the creation of an edit-on-start parameter which is a symbolic link called "write data" . The symbolic link is created by pressing the Create button on Figure 4b. The value of this symbolic link is set to the ODB key /logger/write data in Figure 4c. The resulting link is shown in Figure 4d.
Figure 4 Creating subdirectory or symbolic link (click to enlarge thumbnails)
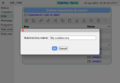
Figure 4a:
Create subdirectory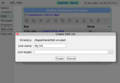
Figure 4b:
Create symbolic link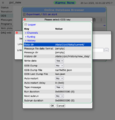
Figure 4c: Click on "(empty)" and fill in /logger/write data
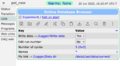
Figure 4d: Symbolic link has been created


Delete an ODB key

The user can delete a key in a tree or subtree by clicking the Delete button. The user selects which to delete from a list of the keys in the subtree (e.g. Figure 5).
Search the ODB for a key

Click on the Find button. A pop-up (Figure 6) appears in which the user types the relevant information.
Create Elog entry

An elog entry can be created easily from the ODB page by clicking the
Create Elog from this page button. A pop-up will appear for the user to fill in (Figure 7).
Limitations
The ODB Page editor supports a subset of the functionality of odbedit. For example, the ODB Page editor does not support re-ordering or renaming ODB keys. For full editing capabilities odbedit must be used.